Pre-Requisites
- 1 running instance of NetApp Service Level Manager(NSLM).
- Docker Engine 1.12.5. installation on atleast 2 Linux Nodes
- NetAppDVP 1.13. installed and configured on all Linux Nodes with Docker-Engine
- 1 running instance of JFrog Artifactory
Note
All validation in this solution has been done with RHEL 7.3, the source files can run on any flavour of Linux.
Any number of nodes can be added in the swarm cluster, for demo purposes 2 node cluster considered in this validation.
- Keep the following storage details handy:
- Management LIF IP: ________________________
- Data LIF IP: ________________________
- Storage Virtual Machine(SVM) name: ________________________
- SVM Username: ________________________
- SVM Password: ________________________
- Aggregate Name: ________________________
- The tools in this framework use following ports, make sure following are open within your firewall:
Protocol Port Used By TCP 2377 Docker Swarm TCP and UDP 7946 Docker Swarm TCP and UDP 4789 Docker Swarm TCP 80 GitLab TCP 1024 Jenkins TCP 50000 Jenkins Slaves
Configuration
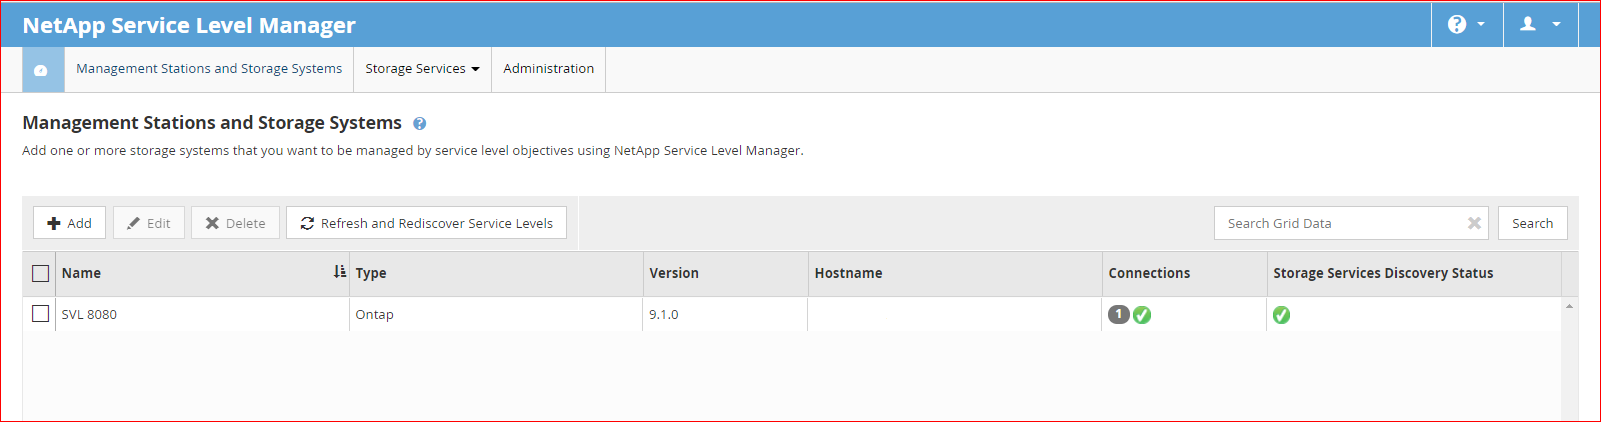
Adding ONTAP Storage system in NetApp Service Level Manager
1.1) Open a web browser and enter the URL “https://xx.xx.xx.xx:8443/admin/” where xx.xx.xx.xx is the IP address of the host machine where NetApp SLM is installed.
1.2) Enter your NSLM username and password when prompted.
1.3) Click on +Add and enter the details of your ONTAP Cluster.
1.4) Verify that the instance of ONTAP is added as shown in the screenshot.
Building a docker image for your environment
2.1) Get the source code from NetApp Jenkins Framework Github Repo.
2.2) Edit the /Jenkins_Master/ontap-nas.json file with appropiate values.

2.3) After the ontap-nas.json file is configured, build the Jenkins Master docker image using following command:
>>docker build -t image_name:tag2.4) Once the build is complete, push the Docker image to a registry using following command:
>>docker push registry/imagename:tag
- Setting up a Docker Swarm Cluster
3.1)Login into a Linux Node with Docker-Engine installed.
3.2)Initialize Swarm cluster using following command:
>>docker swarm init
Note
- If there are multiple ethernet ports(eth0...ethn) configured on the host then “–advertise-addr” <IP-Address of Swarm Host> argument needs to be provided with swarm initialization.

- This node will act as a Swarm manager and all swarm commands run only on the manager node.
3.3) Copy the swarm token generated by the aboce command and run it on a new Linux node. This new Linux node will join the swarm cluster as a swarm worker node.

Note
Any number of hosts can be added in your swarm cluster, this validation demonstrates use of a 2 node swarm cluster.
3.4)Verify the status of our Swarm cluster by running the command:
>>docker node lsBoth the nodes should be visible in the node list

- Running NetAppDVP on the Docker-Engine Hosts
4.1) Make sure NetAppDVP is running on all the Linux nodes added in swarm cluster. A netappdvp process should be seen on the host
>>ps ax | grep netappdvp
- Start the NetApp-Jenkins Docker Service
5.1) Start the NetApp-Jenkins-Master Docker Service using following command. Use the docker image built in step 3
>>docker service create --replicas 1
--mount "type=bind,source=/var/run/docker.sock,target=/var/run/docker.sock"
--constraint 'node.role==manager' --restart-condition on-failure
--mount "type=volume,source=Jenkins_home,volume-driver=netapp,target=/var/jenkins_home"
--publish 50000:50000
--publish 1024:8080
--name jenkins registry/imagename:tag
5.2)This command will create a docker service of a Jenkins instance with the Jenkins_Home directory mounted on a NetApp volume.To check if the Service is created successfully use the following command
>>docker service ps jenkins
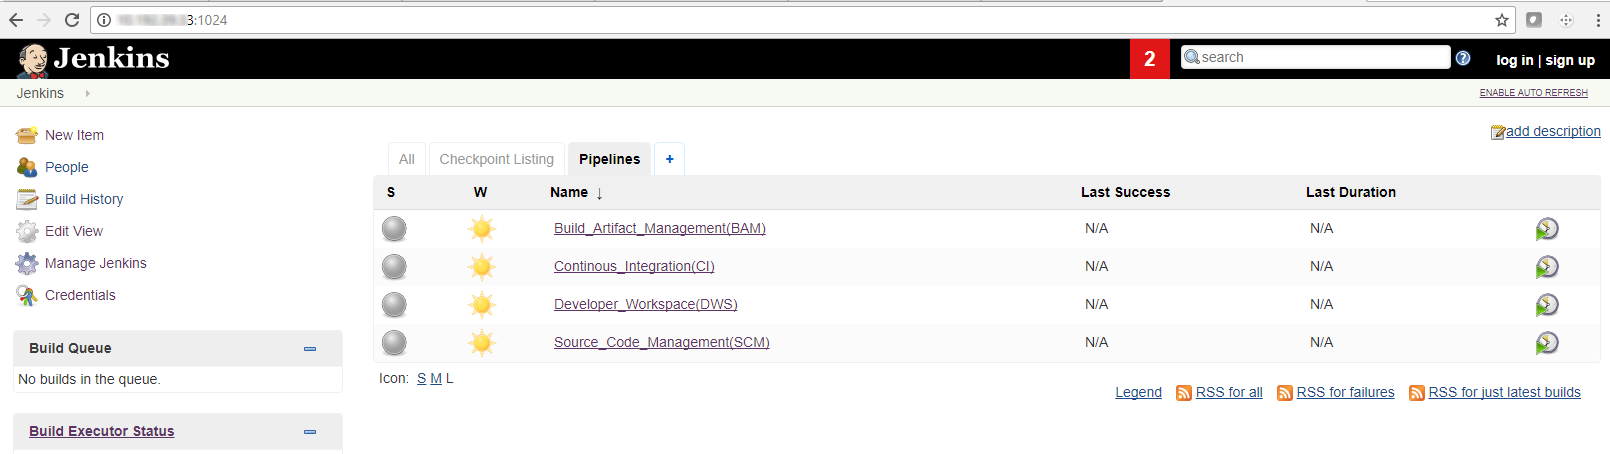
- Access Jenkins UI from a Web browser
6.1) Once the Jenkins Docker Service is up, Navigate to the URL: http://xx.xx.xx.xx:1024/ ,where xx.xx.xx.xx is Jenkins URL
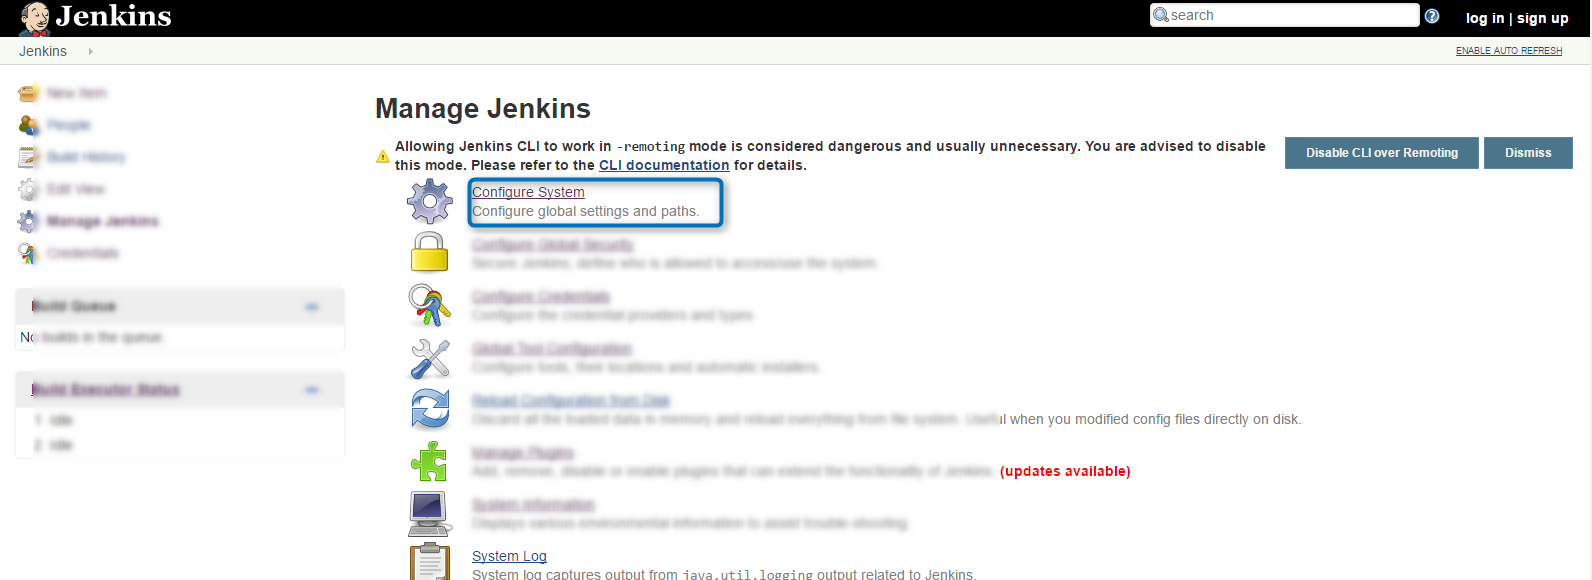
- Setting up environment variables and JFrog Artifactory in Jenkins
7.1) In Jenkins UI navigate to Manage Jenkins>Configure System (http://xx.xx.xx.xx:1024/configure), where xx.xx.xx.xx is Jenkins URL

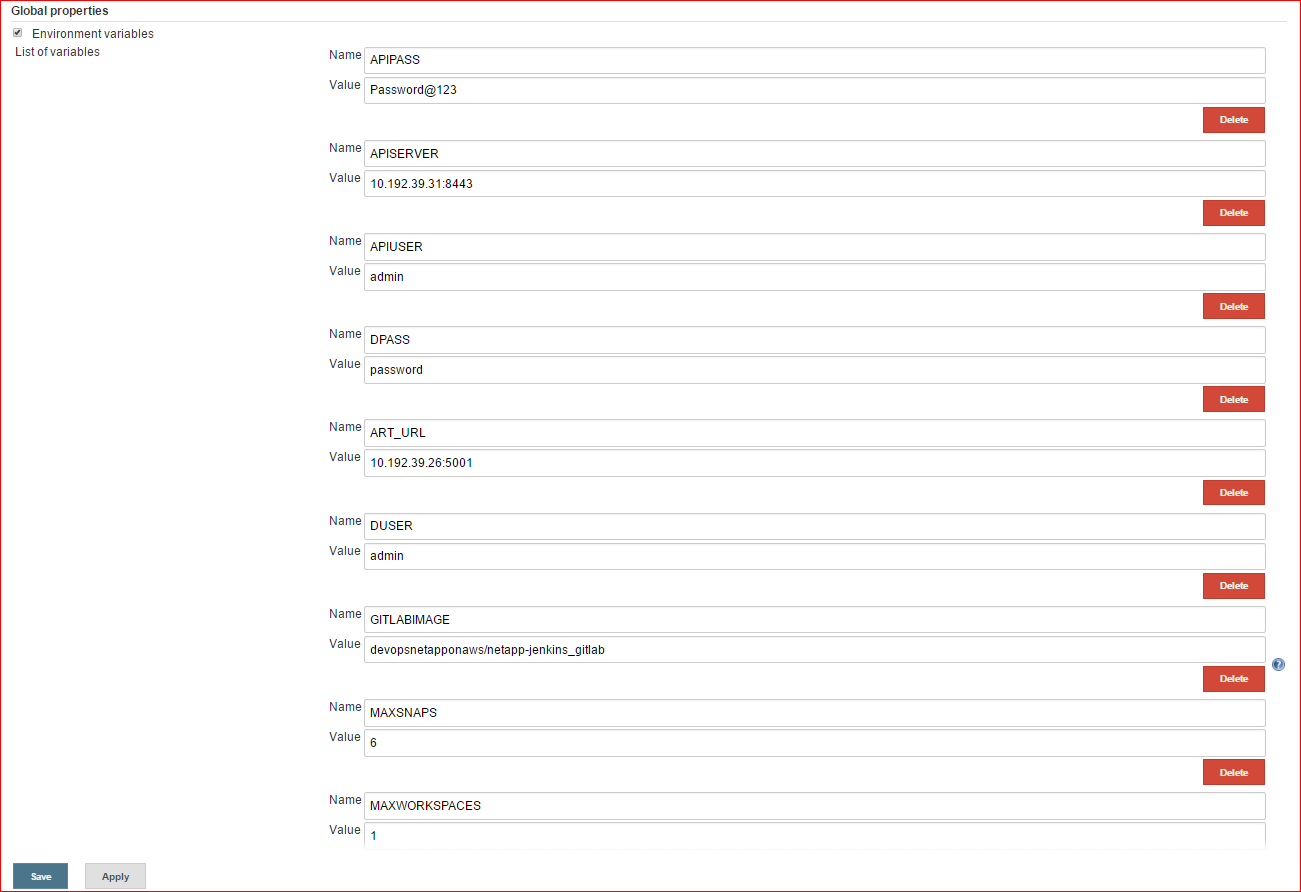
7.2) Configure the following environment variables:
Variable Name Default Value What it does? APISERVER xx.xx.xx.xx:8443 URL of you NetApp Service Level Manager Installation APIUSER admin Username of NSLM installation APIPASS Password@123 Password of NSLM installation SLAVE devopsnetapponaws/netapp-jenkins_slave:autodiscover Jenkins Slave Docker image name GITLABIMAGE devopsnetapponaws/netapp-jenkins_gitlab SCM Docker Image name VOLSIZE 4096 Size of volumes created in MB’s VS lab2 Storage Tenant to create volumes REPOUSERNAME admin Username for private docker registry REPOPASSWORD password Password for private docker registry ART_URL xx.xx.xx.xx:5001 URL of your private registry(IP:PORT) ART_REPO docker-dev Repository name to push docker images and zip files Sample configuration:
- Setting Up Artifactory
8.1) In Jenkins UI navigate to Manage Jenkins>Configure System (http://xx.xx.xx.xx:1024/configure) , where xx.xx.xx.xx is Jenkins URL
8.2) Scroll down until the Artifactory section
8.3) Enter your SERVER ID (eg: 1)
8.4) Enter your Artifactory Server Link
8.5) Click Save
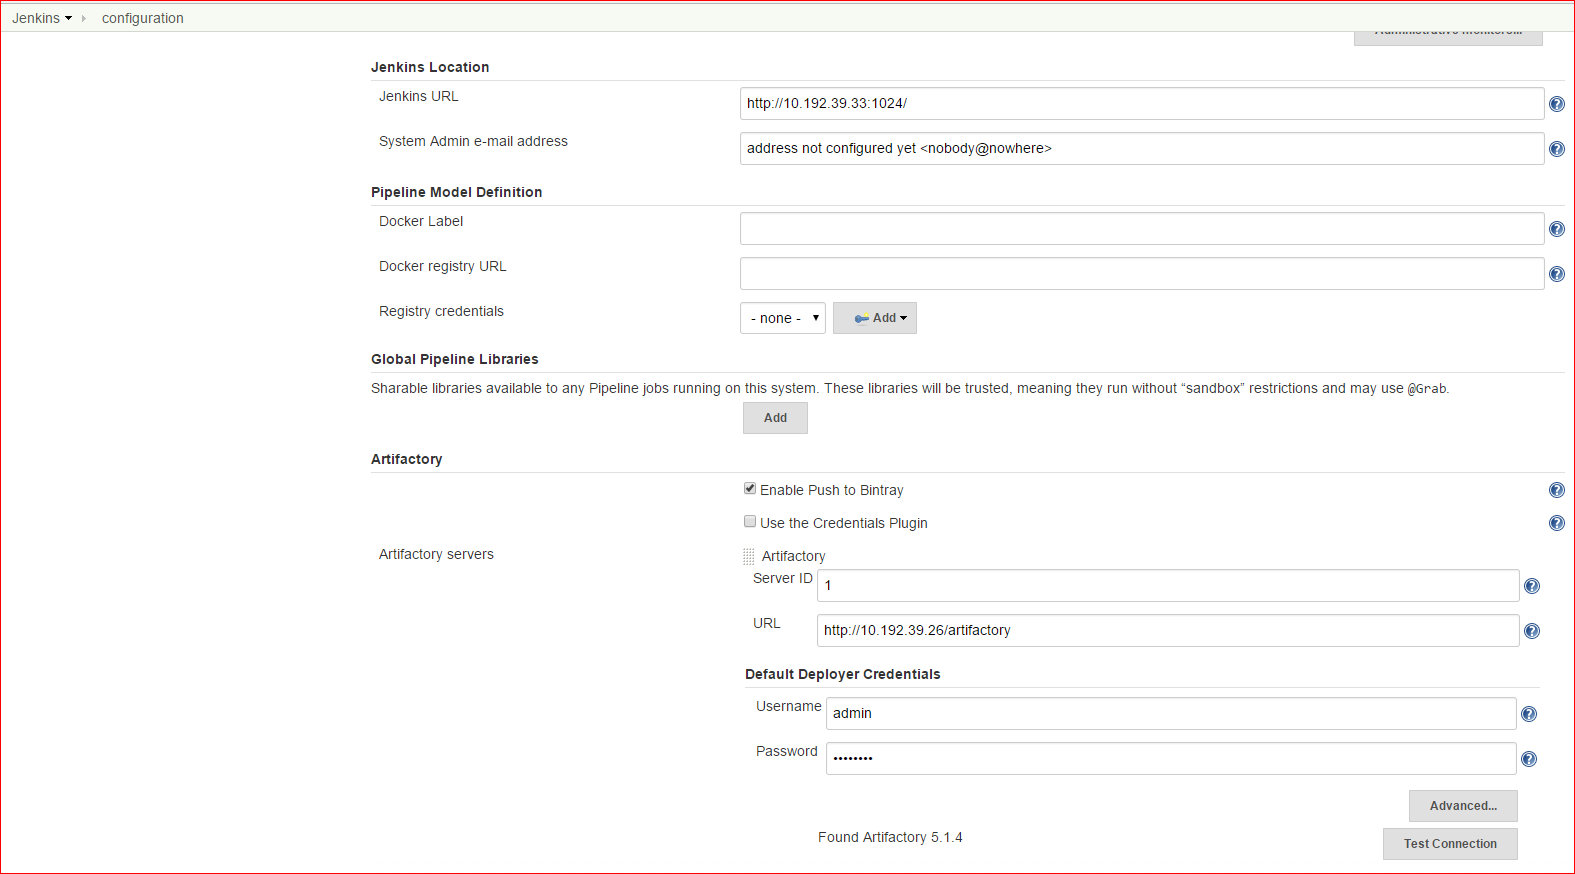
Note
Check if the Jenkins URL in Jenkins Location tab maps to the URL of the Linux node running the Jenkins Master Docker Service.
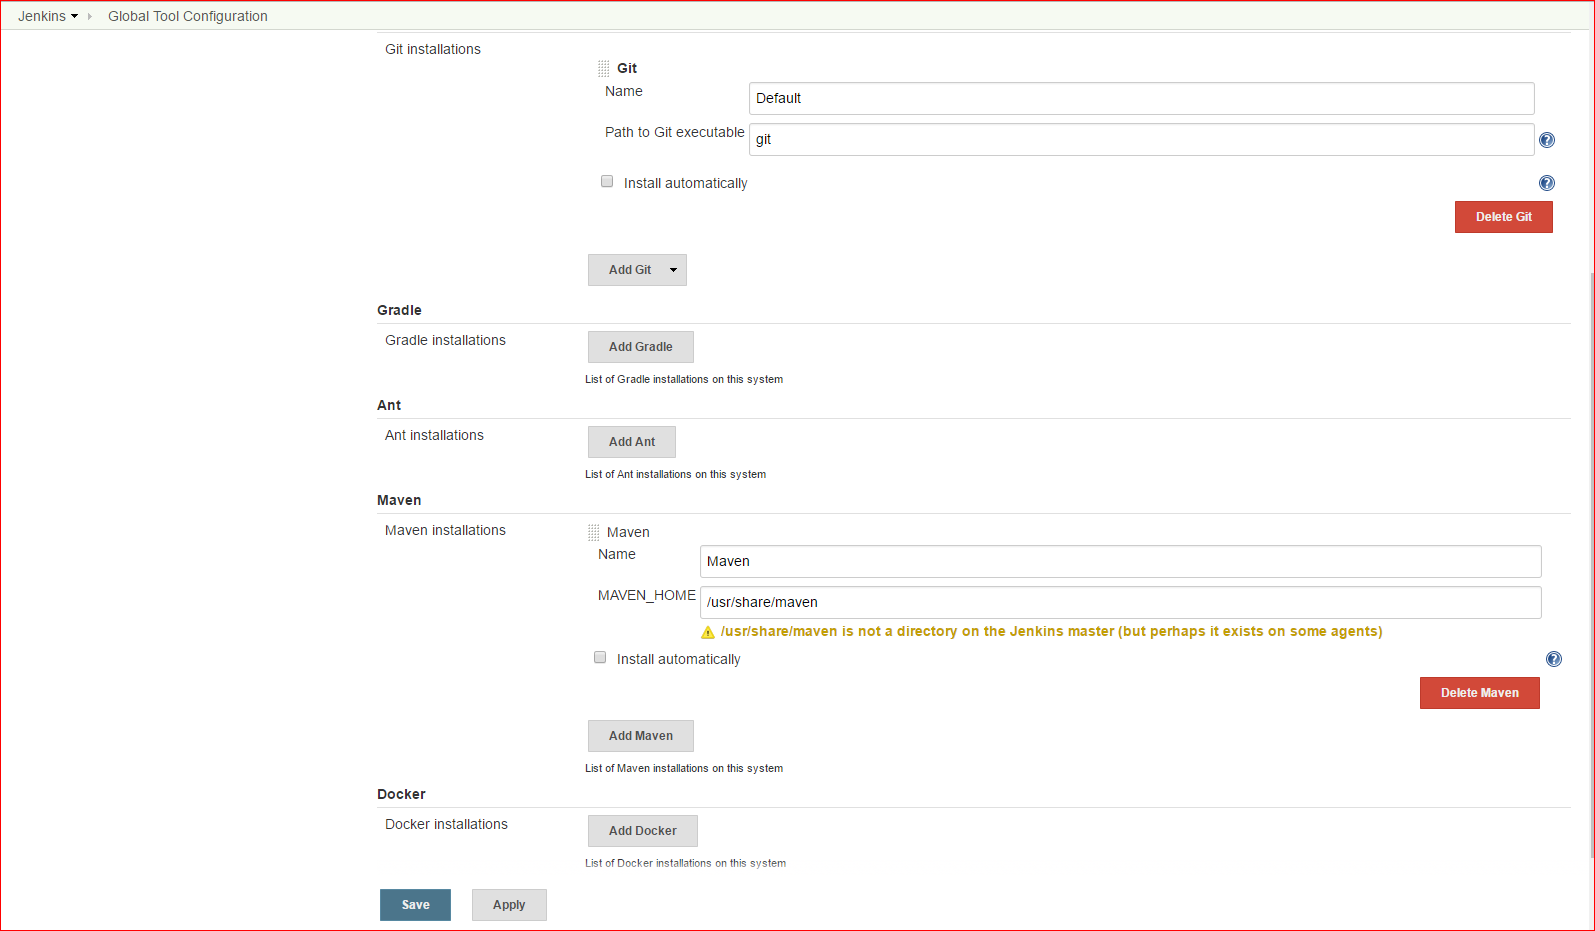
- Configure Maven Home in Jenkins
9.1) In the Jenkins Slave Image we already have installed maven at the default location i.e /usr/share/maven
Note
As part of this validation, a Maven sample project is used, If the production environment has any other type of build, that needs to be configured here.
9.2) Navigate to Manage Jenkins > Global Tool Configuration (http://xx.xx.xx.xx:1024/configureTools/) , where xx.xx.xx.xx is Jenkins URL
9.3) Scroll down till the Maven Section
9.4) Click Add Maven
9.5) Enter Maven Installation name (eg: Maven)
9.6) Enter Maven Path as /usr/share/maven , as shown in below screenshot
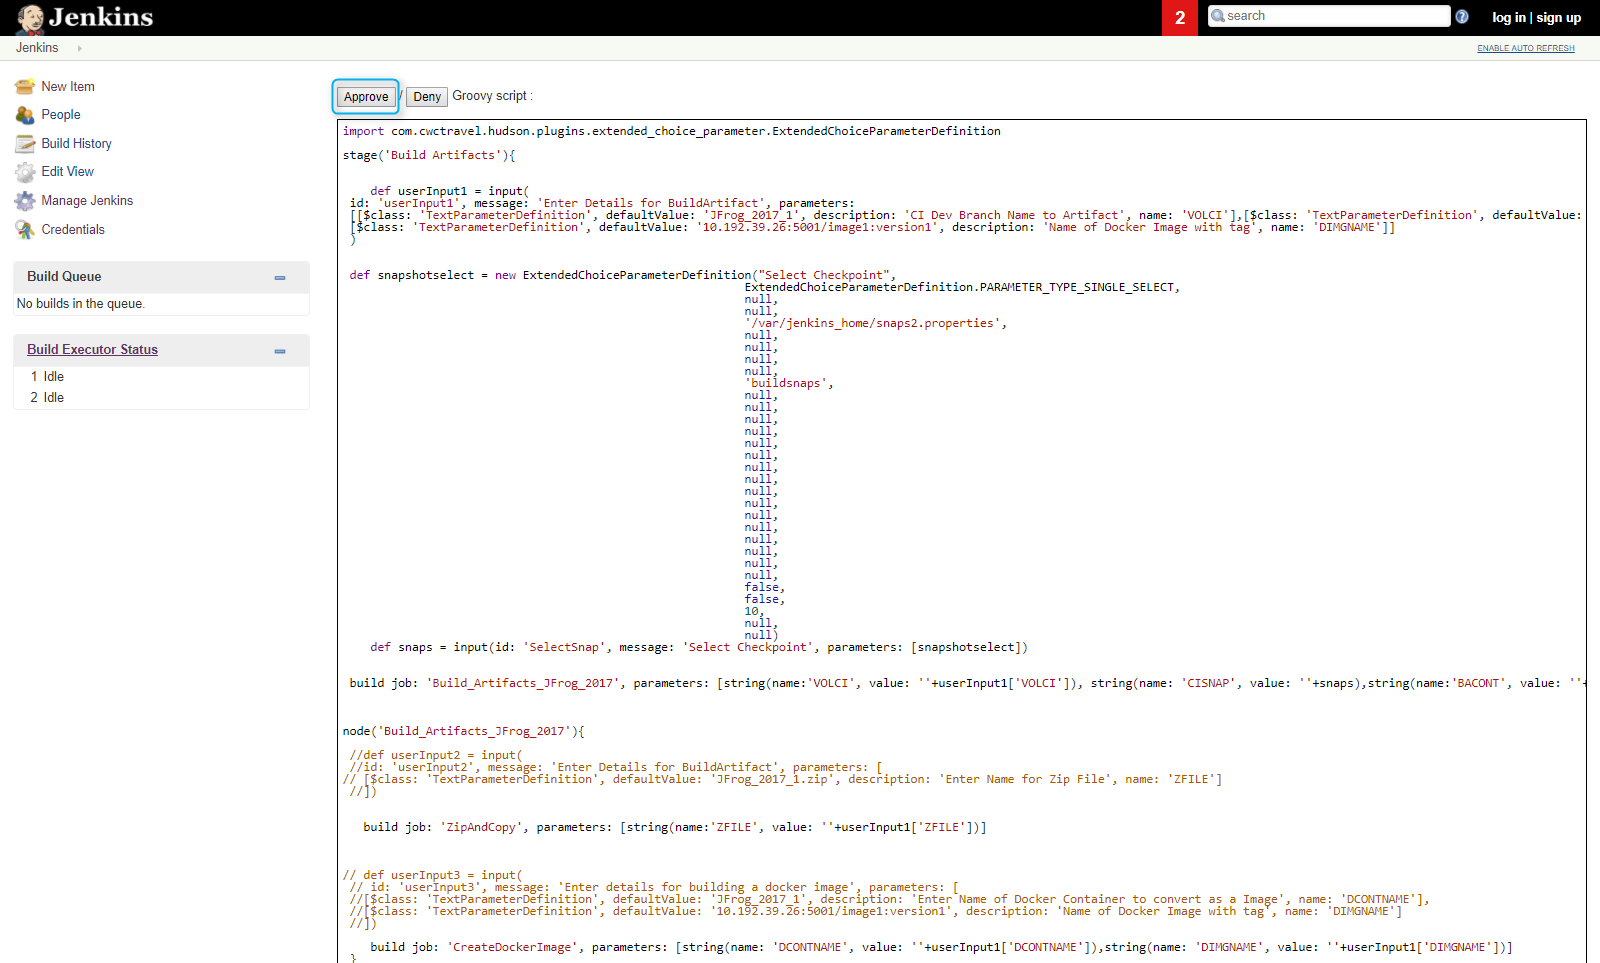
- Approving the NetApp Groovy Pipelines
10.1) In Jenkins UI navigate to Manage Jenkins>In-Process Script Approval (http://xx.xx.xx.xx:1024/configure) , where xx.xx.xx.xx is Jenkins URL
10.2) As per the latest Jenkins security update, any external script in Jenkins needs to be approved. Click Approve for the 4 NetApp Groovy Scripts
Workflow
The CI workflow is defined as following stages in this solution:

- Source Code Management
- Continuous Integration
- Continous Integretion Environment Setup
- Continuous Integration Build Setup
- Developer Workspace Creation
- Build Artifact Management
Predefined Pipelines and Jobs
As an example, following nomenclature for the Jenkins job names is used :
Job Task Default Name used: SCM Setup JFrog_OSS_Repo CI Environment Setup JFrog_2017_1 CI Build JFrog_CI_Build Developer Workspace Name Dev1_JFrog_2017_1 Build Artifact Container Name Build_Artifacts_JFrog_2017 For purpose of explaining pipelines in this documentation, sample opensource scripts from JFrog are used to demonstrate a CI workflow.
https://github.com/JFrogDev/project-examplesThis framework has following prefdefined pipelines and preconfigured jobs:
- Predefined Pipelines
Pipelines Tasks Jobs Included in the Pipeline Source Code Management 1)Spin up a GitLab Docker Container JFrog_OSS_Repo Continous Integretion 1)Get the Local Git Repo URL
2)Spin up Container where CI Builds will Run
3)Pull the code from Gitlab to this container
4)Start the CI Build
5)Automatic Snapshot Creation for Every successful build.JFrog_2017_1
Create_Build_Checkpoints
List_Build_CheckpointsDeveloper Workspace 1)Create prepackaged workspaces (containers) from snapshots UserWorkspaces
SCM_Checkpoints
List_SCM_CheckpointsBuild_Artifact_Management 1)Spin up a container to archive builds
2)Zip a Build Environment and push it to artifactory
3)Create a Docker image of Build environment and push it to a repoBuild_Artifacts_JFrog_2017
Zip_And_Copy
Create_Docker_Image
- Preconfigured Jobs
Job Name Tasks Scripts Included JFrog_OSS_Repo 1)Create 3 NetApp Volumes
2)Spin up a GitLab Container with its Logs,Data and configuration stored on NetApp Volumesscmconfig2.py JFrog_2017_1 1)Create a NetApp Volume
2)Create a Docker Service
3)Mount a NetApp Volume inside the Docker ServiceCI_dev_bracbh_create2.py
Jenkins_slave_create2.pyUserWorkspace 1)Create a FlexClone from a Build Snapshot
2)Create a Docker Service
3)Mount NetApp Clone inside the Docker Serviceuserworkspace_creation1.py
Jenkins_slave_create2.pyBuild_Artifacts_JFrog2017 1)Create a NetApp volume to store zip archives
2)Zip a Build Environment and push it to artifactoryVolume_create.py
Build_Artifact_create.pyZipandCopy This jobs should always run after the Artifacts volume is created and should always run on a Jenkins Slave
1)Zip the contents of a clone volume
2)Move this zip to Artifact Volume
3)Push the zip to Artifactory 4)Delete the clonebuild_artifact_exec.py
clone_purge.pyCreateDockerImage This job should always run on Jenkins Slave
1)Get container id from Docker Service Name
2)Commit the container
3)Build Docker Image of the container
4)Push the image to a private repodockerimagecreate.py CreateBuildCheckpoints 1)Create a NetApp Snapshot
2)Tag build name and number to snapshot name
3)Write snapshot name to properties file so that extensible choice parameter plugin can read and display it in a dropdown menusnapshot_create_write.py SCMCheckpoints This job is supposed to run by a Git WebHook for successful push
1)Tag a SHA number to name of a Snapshot
2)Create a netapp snapshotscmcheckpoint_create.py List_Build_Checkpoints 1)Display Snapshots for CI Build Volume snap_show.py List_SCM_Checkpoints 1)Display Snapshots for SCM Volume snap_show.py Purge Policy This job is supposed to run on a cron schedule
- Find Free and Busy Snapshots
- Delete Free snapshots above a predefined number
- If Number of busy snapshots exceed a certain predefined value display and alert
purge.py
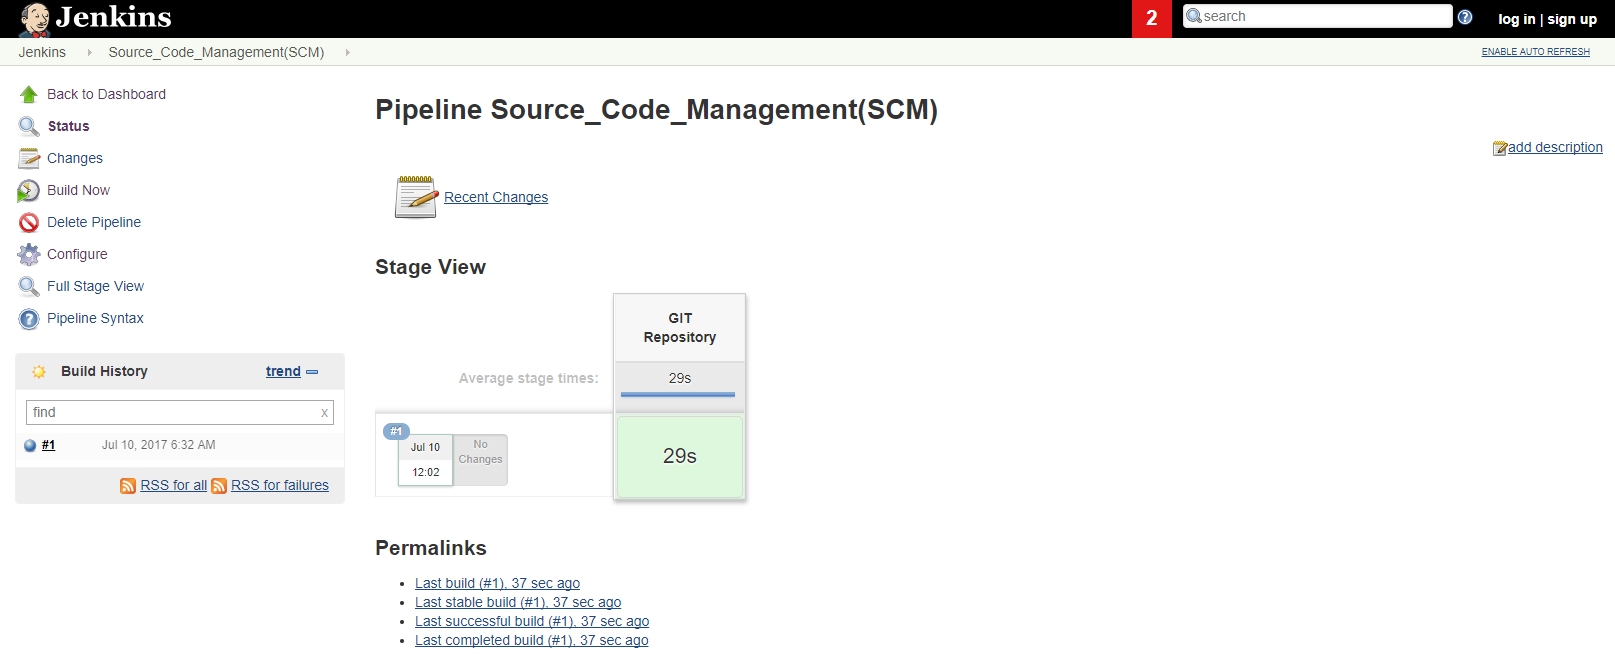
1. Source Code Management Setup
This pipeline will setup a GitLab container which acts as a SCM tool in this solution.
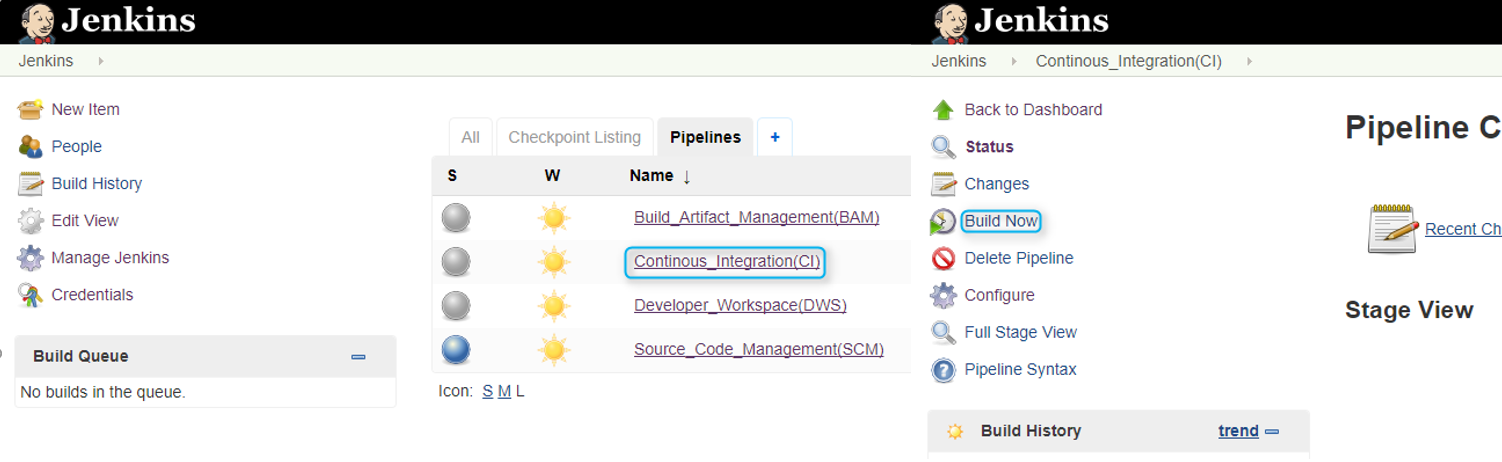
1.1) Click on the Source_Code_Management > Build Now
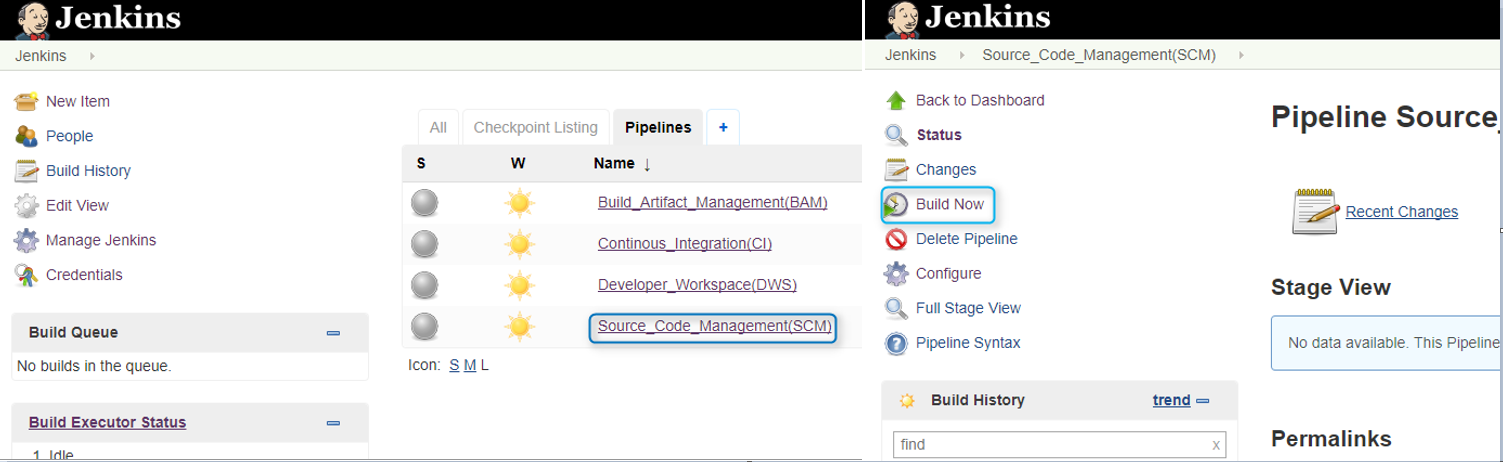
1.2) A Jenkins Stage named GIT Repository is started when the Source_Code_Management pipeline is built.
1.3) The GitLab Container can be seen on the Linux Host by running a “docker ps” command.:
>> docker ps
Note
It takes about 2-5 minutes for GitLab to start.
1.4) Configuring Gitlab Navigate to http://<<RHEL-VM-IP>>/ in your browser and and set a root password for GitLab

1.5) After you set a password, Login into Gitlab using the recently set password on the same page.

1.6) Once logged into GitLab, Create a New Project

1.7) Import code repo into the local GitLab instance. For this validation Sample Hello world codes from JFrog’s GitHub Repo are used:
https://github.com/JFrogDev/project-examples.git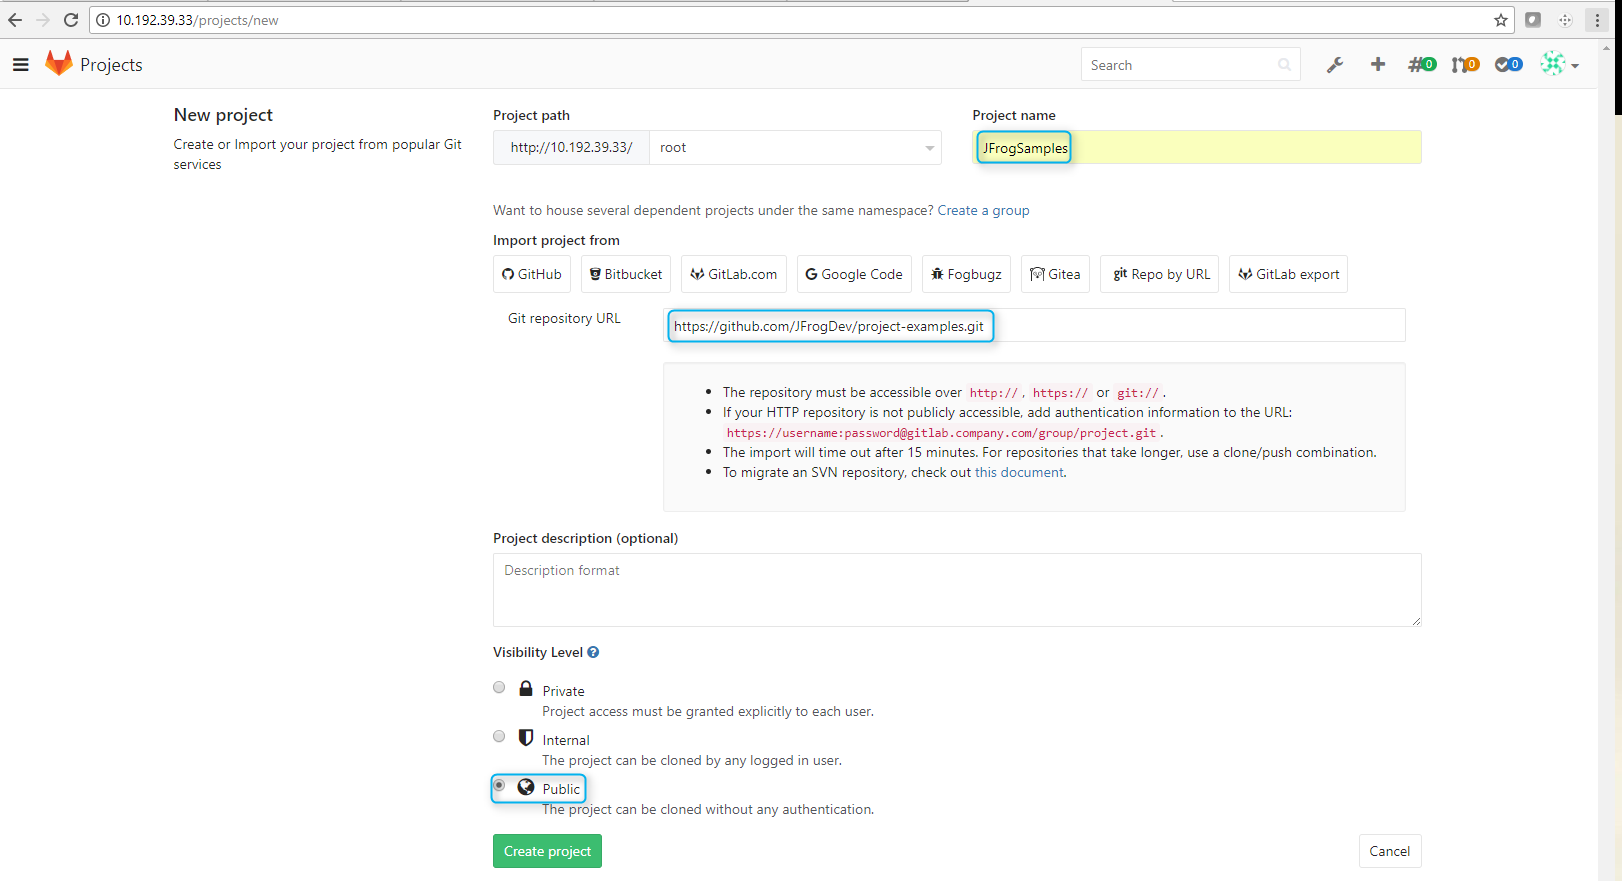
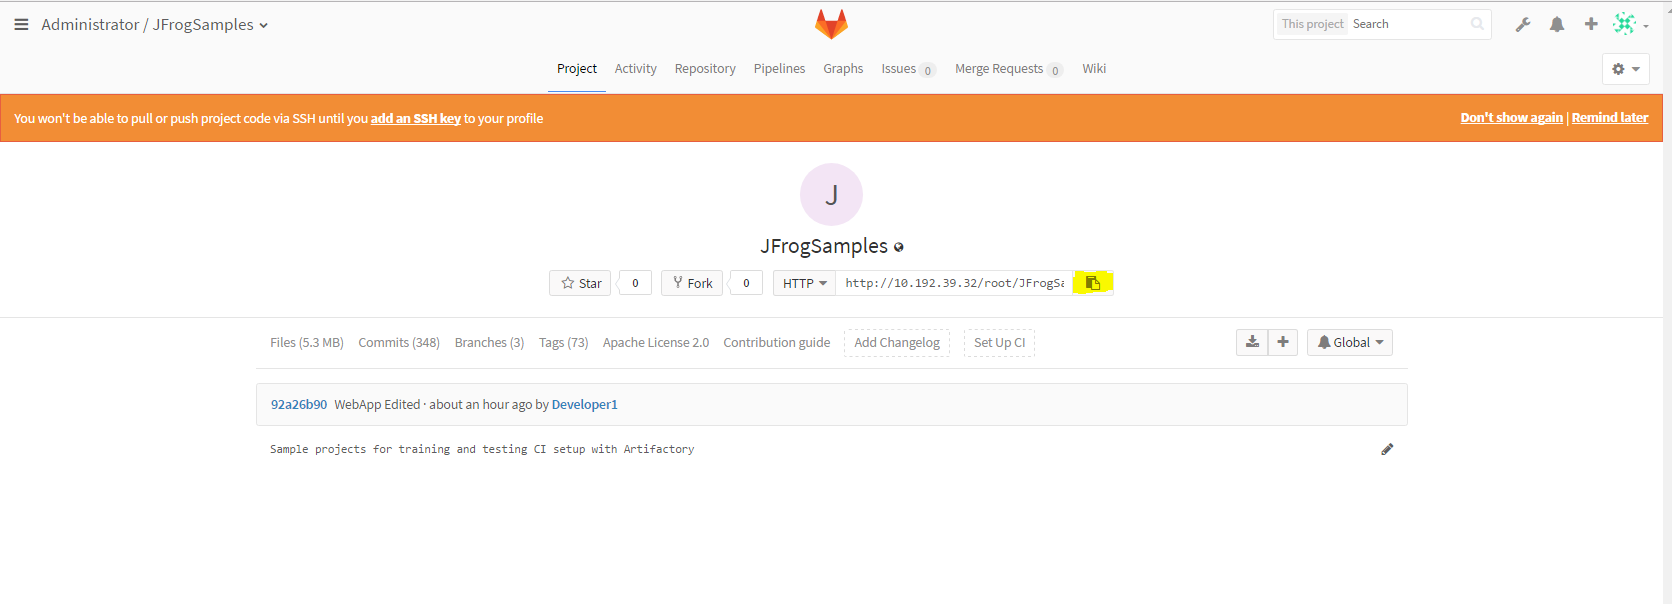
1.8) When the code import is complete, Note the Local Git URL
- 1.9) Adding a WebHook for automatic SCM Checkpoint Creation.
To add a webhook in Jenkins, Click the Settings button at right corner of the GitLab project and select Integrations
Add a the following Jenkins Job WebHook URL
http://<<Jenkins-Master-IP>>:1024/job/SCMCheckpoints/buildWithParameters?token=secret&VOL=<<SCM_Project_Name>>Add the Secret Token as “secret”
Click Add WebHook
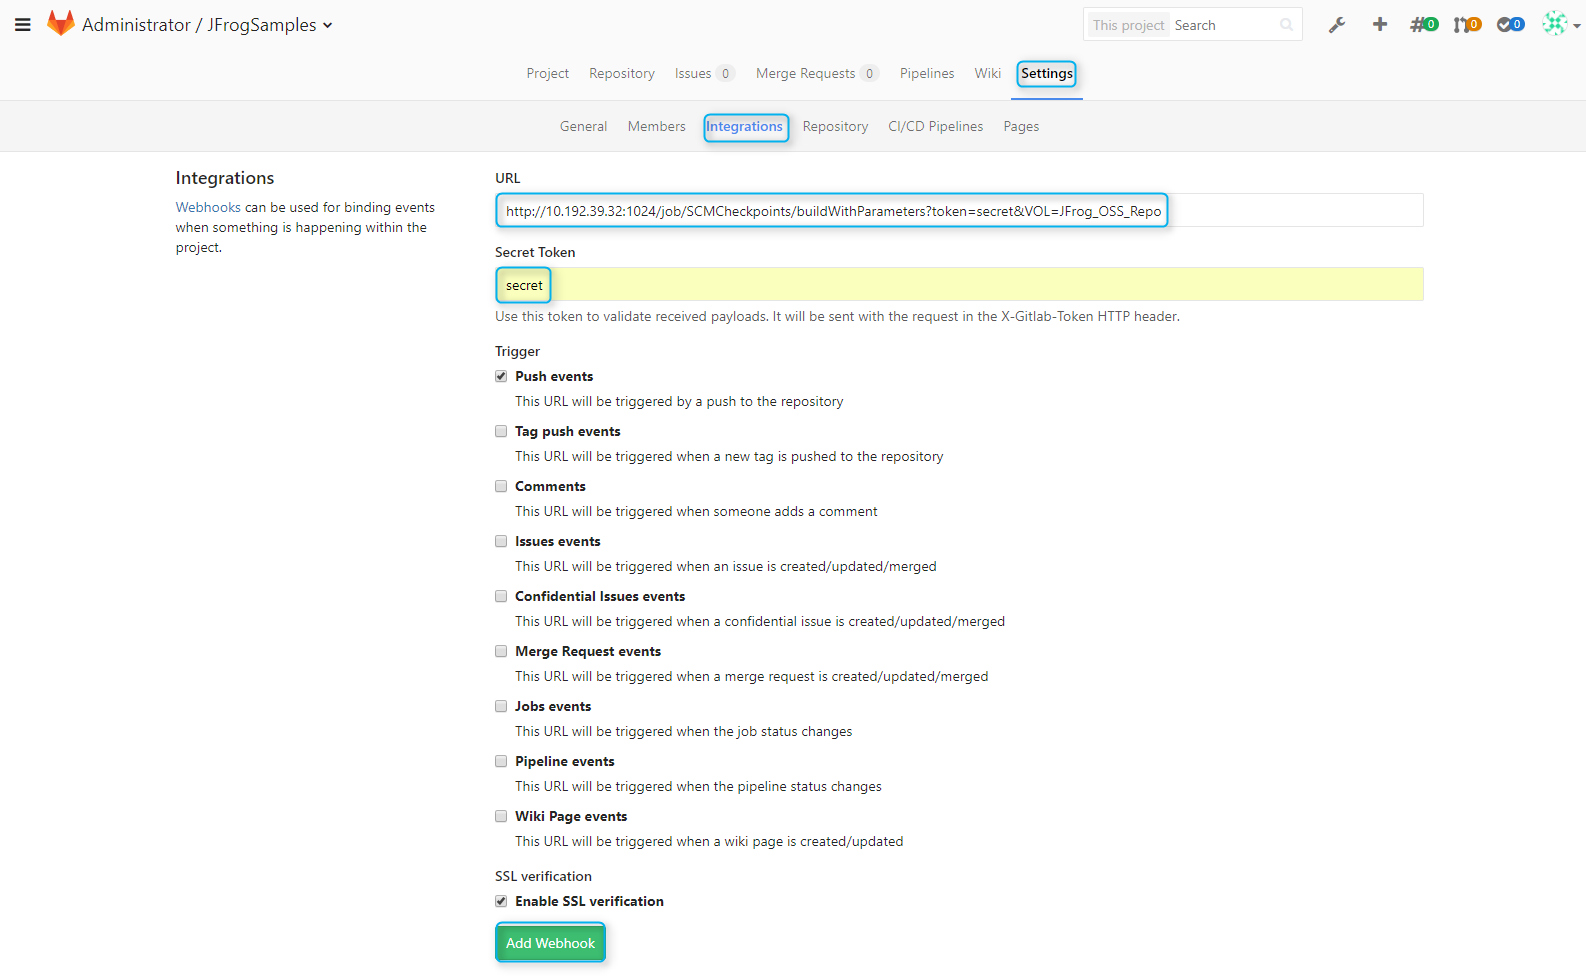
- This WebHook will automatically trigger a Jenkins Job(SCMCheckpoints) to create snapshot for every git push made in the SCM
Note
If you change your SCM Job name in Jenkins , use the same job name in this WebHook, as this will trigger a snapshot of your SCM volume.
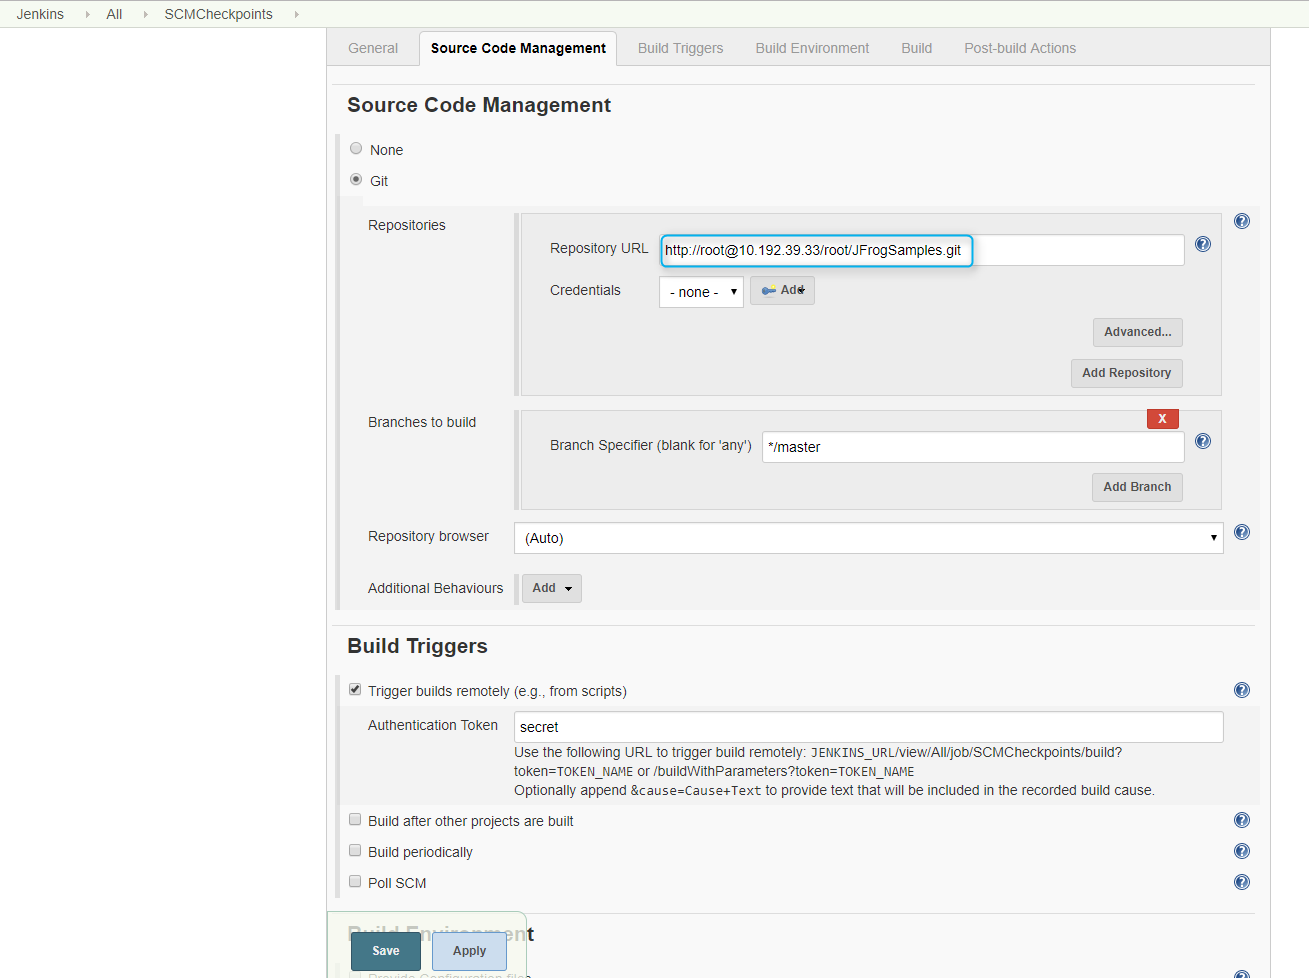
Navigate to SCMCheckpoints job on Jenkins UI . (http://xx.xx.xx.xx:1024/view/All/job/SCMCheckpoints/configure) , where xx.xx.xx.xx is the IP of your RHEL VM running the Jenkins OSS Container.
The build trigger in Authentication Token field should correspond to secret key set in GitLab WebHook
Make sure the SCM Section has the Git URL of the project as it collects the SHA ID from here.
2. CI Environment Setup
This pipeline will build a Continuous Integration Environment where a CI Build will run for the project
2.1) The Continuous Integration (Integrated Builds) stage will build a Docker Container named JFrog_2017_1 which acts as our CI-Environment with a NetApp Volume named JFrog_2017_1 mounted on it.
2.2) The CI Environment runs as a docker service on one of the swarm node. This can be verified by listing all docekr services on Swarm Manager node.:
>>docker service ls2.3) To check where the service is running , use the command
>>docker service ps <<CI-Environment-Job-Name>
2.4) A NetApp volume mount can be verified on the linux host by going inside the context of the container
>>docker ps
>>docker exec -it <<Container-ID>> bash
>>df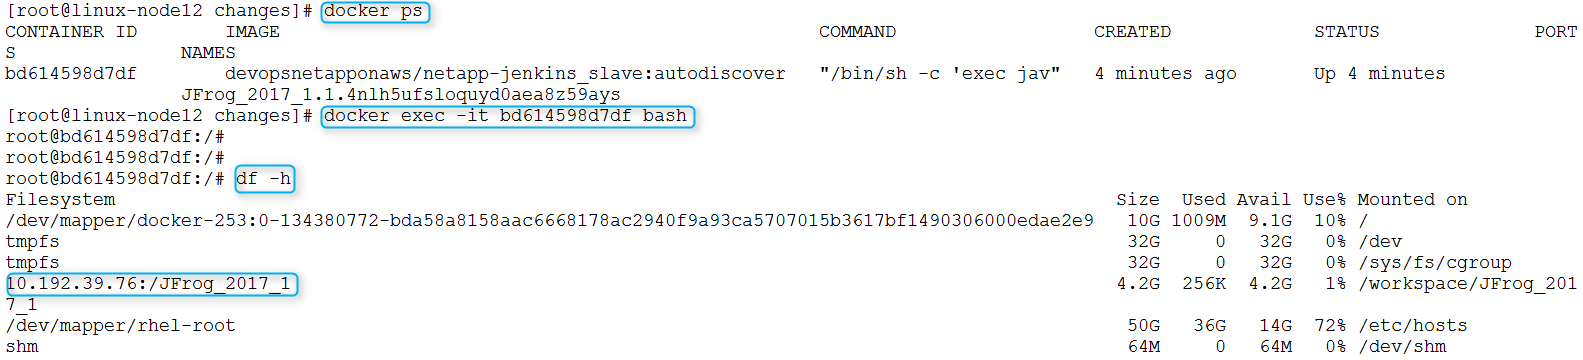
3. CI Build Setup
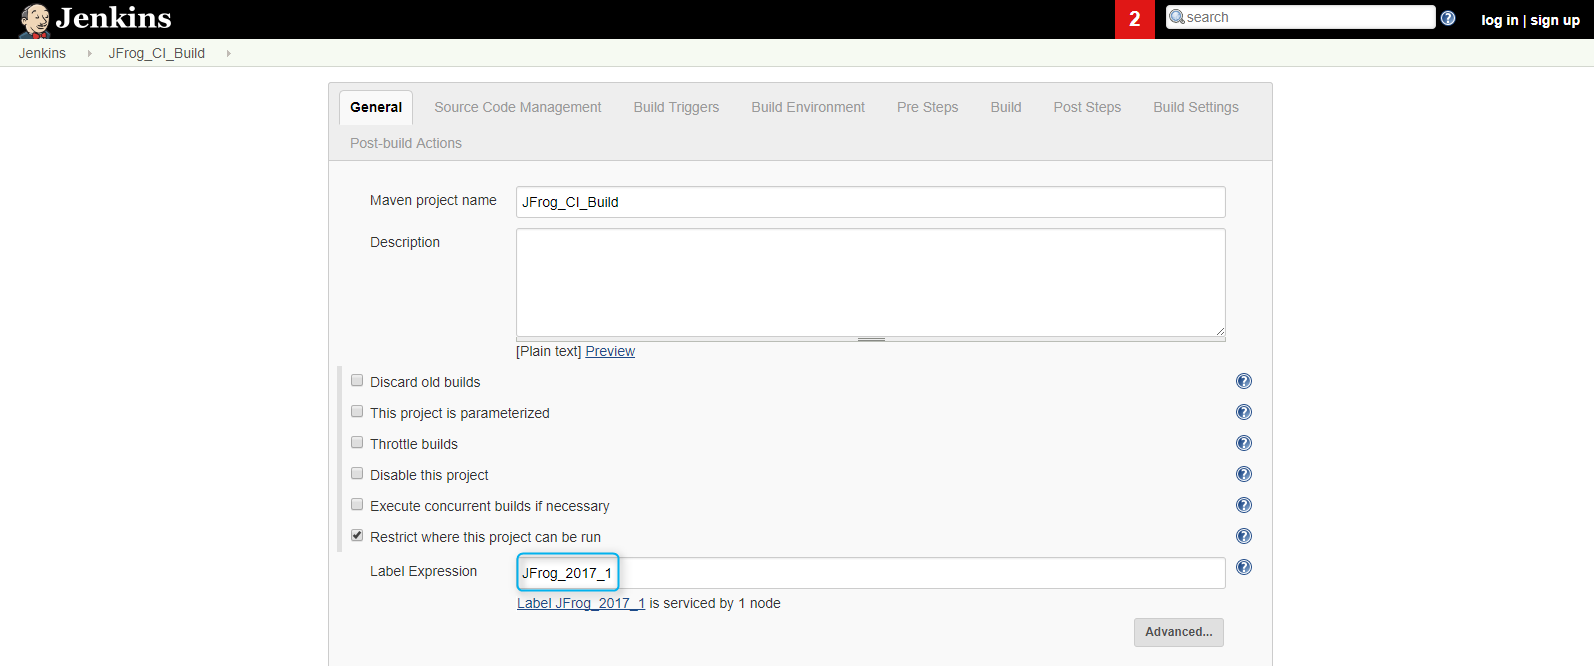
3.1) Create a Maven Job named “JFrog_CI_Build” in Jenkins by going to New Item > Create Maven Job
Note
For this validation a sample Hello-World maven code from JFrog_Repo is used.
3.2) Configuring the JFrog_CI_Build Maven Job
Following sections need to be configured in the Maven Job:
- Restrict the project to run in the previously created CI-Environment Enter the label : “JFrog_2017_1”
- Add Local Gitlab URL in the SCM section

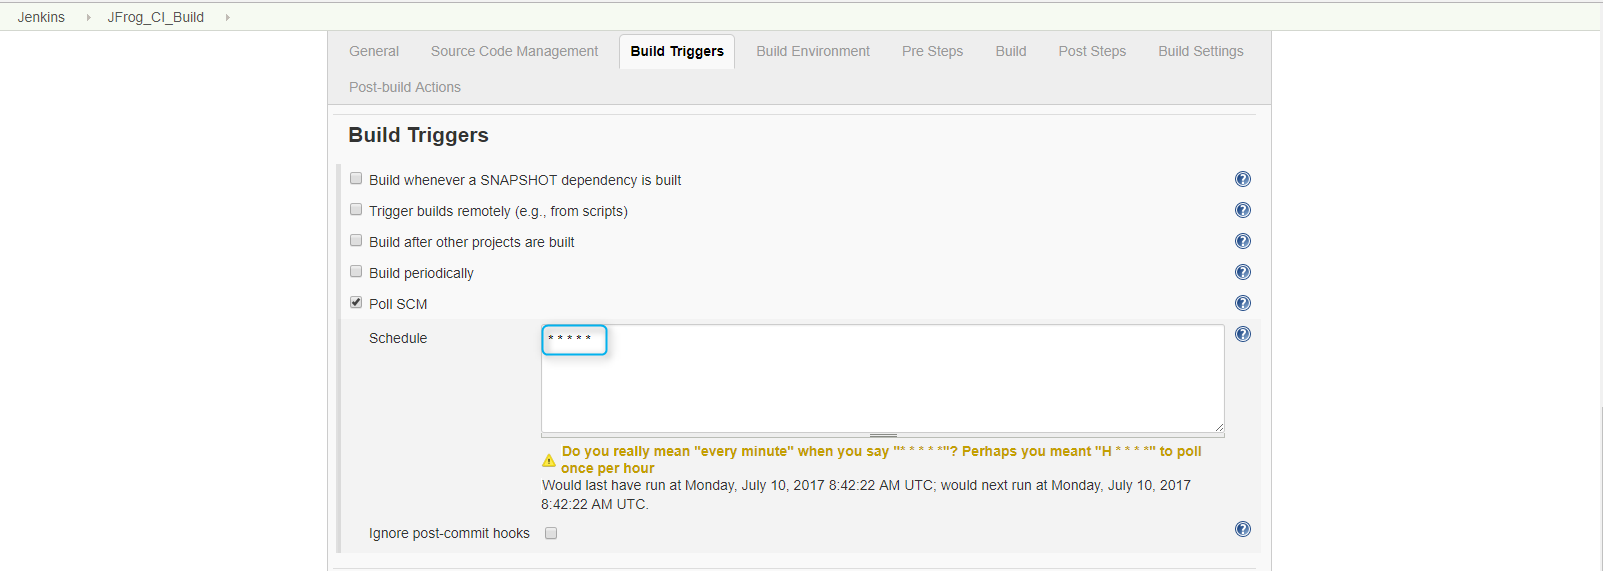
In Build Triggers select the option POLL SCM and set per minute polling schedule:
* * * * *
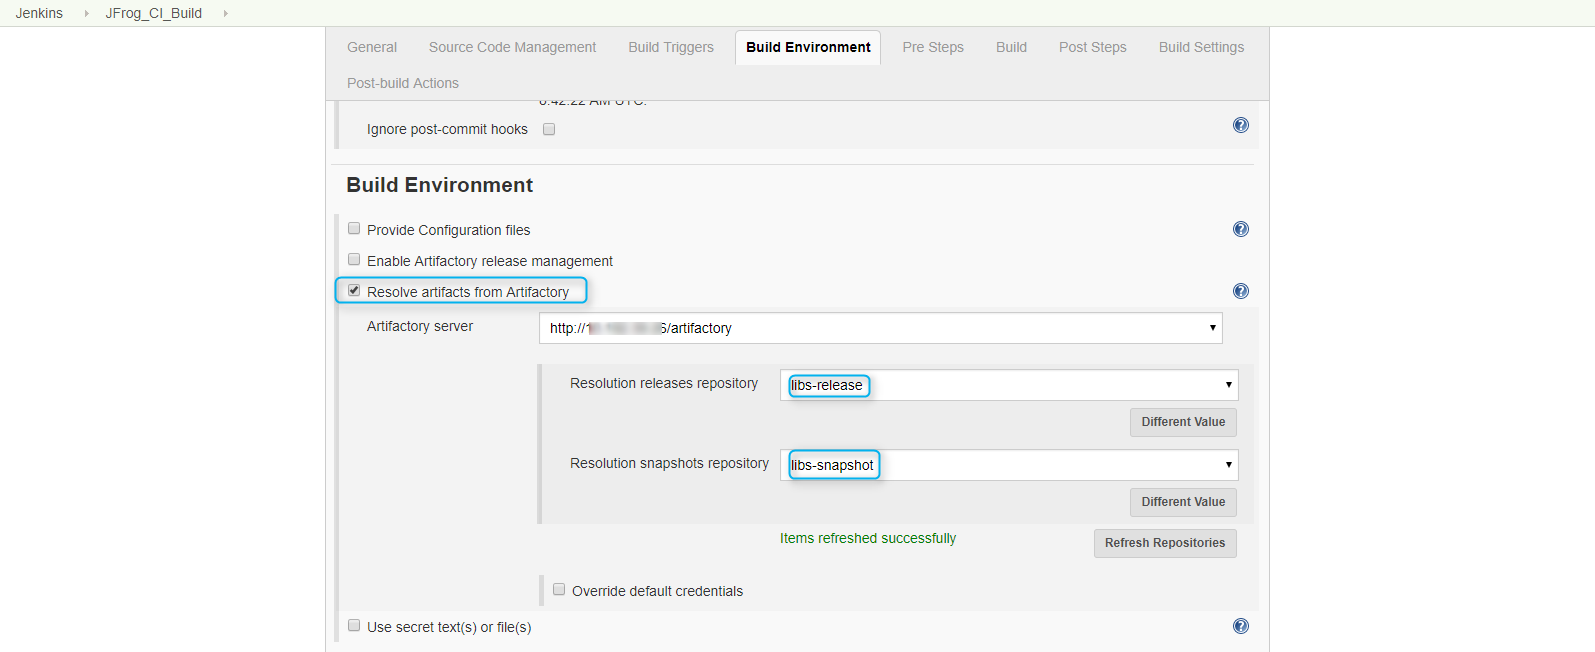
- In Build Environment Section, select Resolve Artifacts from Artifactory. Click Refresh Repositories Select the repositories to resolve the artifacts from Artifactory
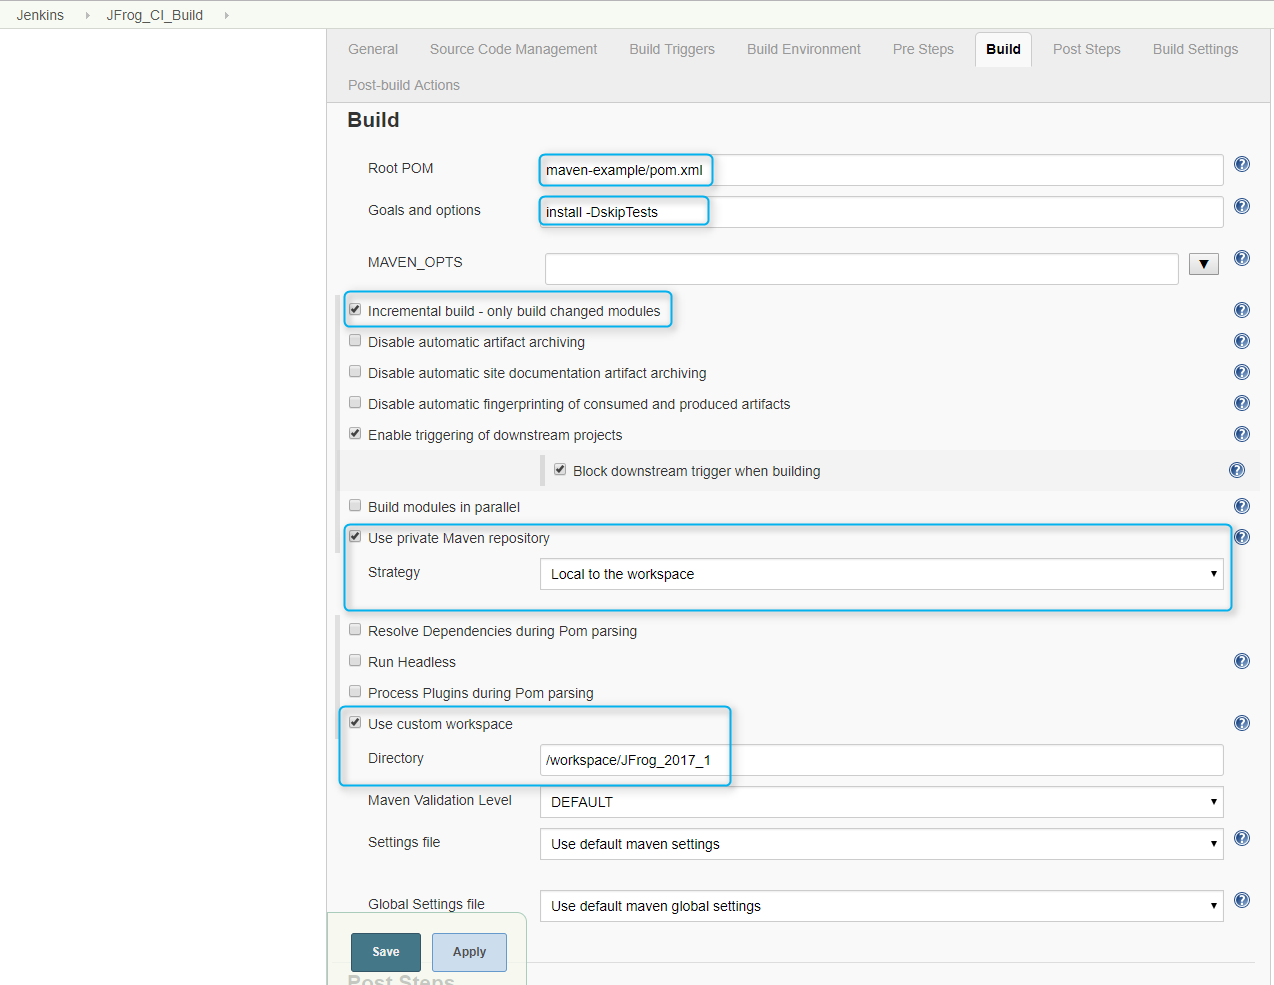
In the Build Section, enter relative path of the pom.xml file and set the install goal
ROOT POM:     “maven-example/pom.xml”
Goals:        “install -DskipTests”
Select Use private Maven Repository checkbox and point it to use Local to Workspace. This ensures all the artifacts stay on a NetApp workspace.
Click the Advanced tab and select use Custom Workspace, Enter the workspace as:
/workspace/<<CI-Environment-Name>>This ensures that the project is being built on a NetApp workspace.
Note
- Fill in these values as per your environment/code structure
- The custom workspace field should be in the format “/workspace/ <<Your-CI-Environment-Job-Name>>
3.3) Configuring automatic creation of snapshots of successful builds.
- Navigate to All Jenkins Jobs
- Select the job “Create_Build_Checkpoints”
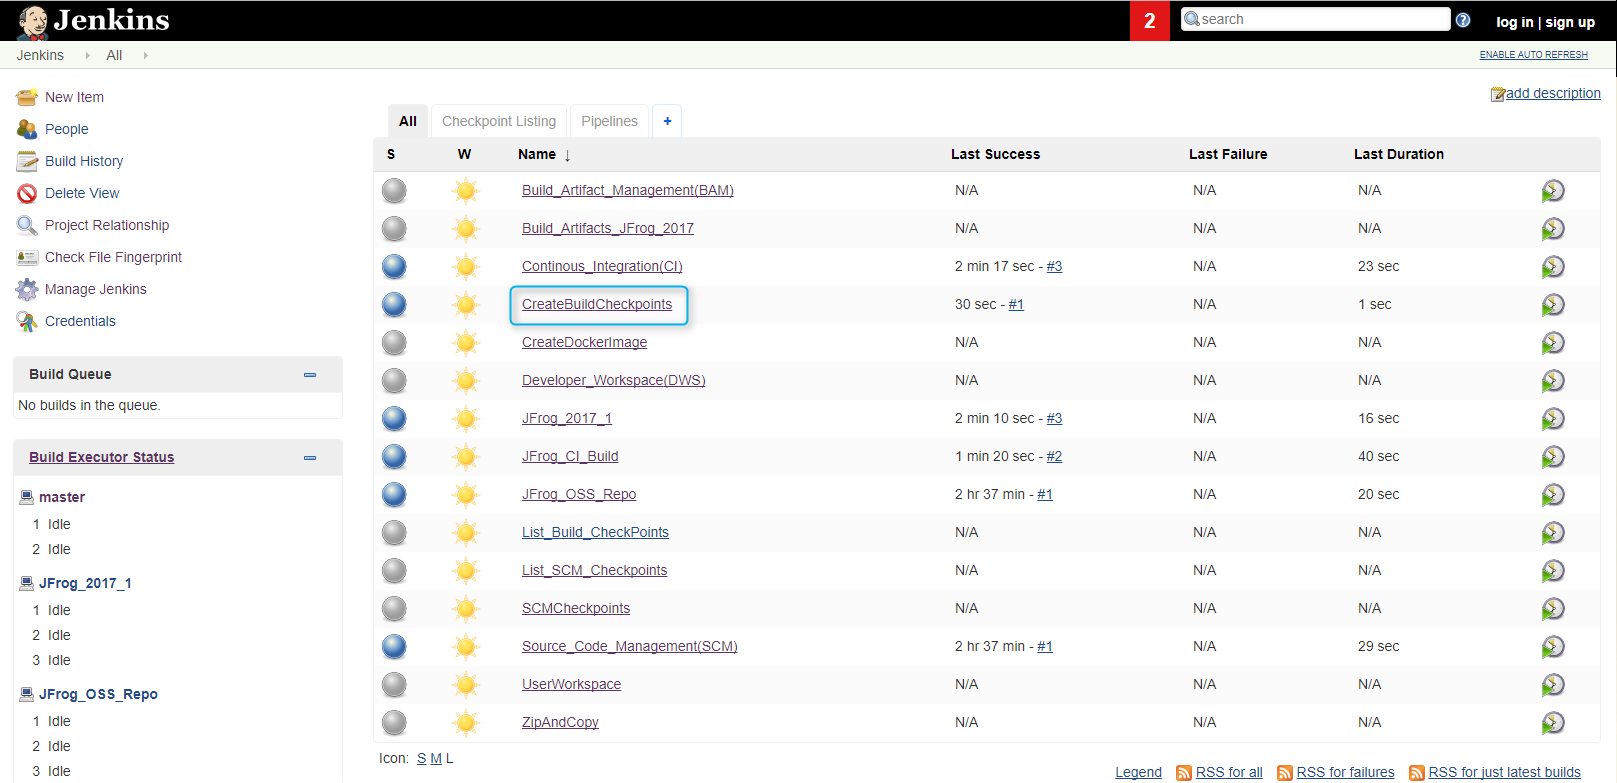
- Select Configure
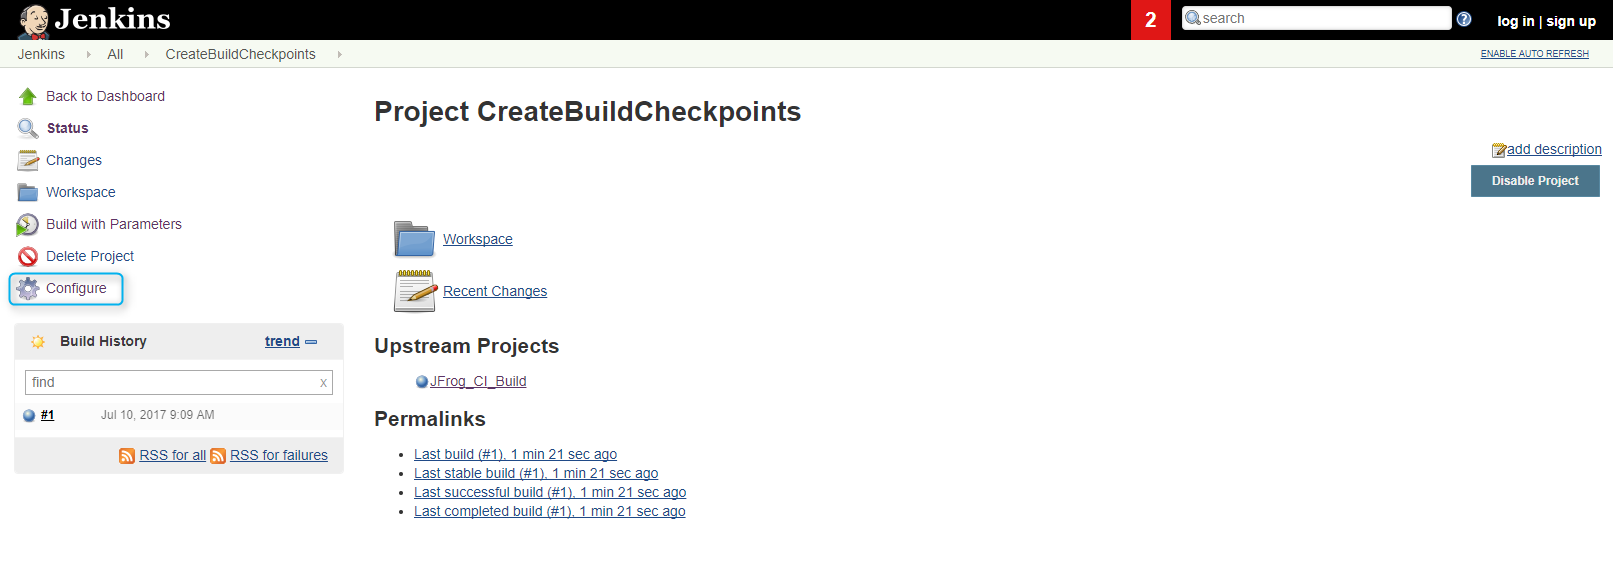
Configure the folloeing sections of CreateBuildCheckpoints job:
- In the general section, Select this project is parameterized option and set the default value as your <<CI-Environment-Name>>
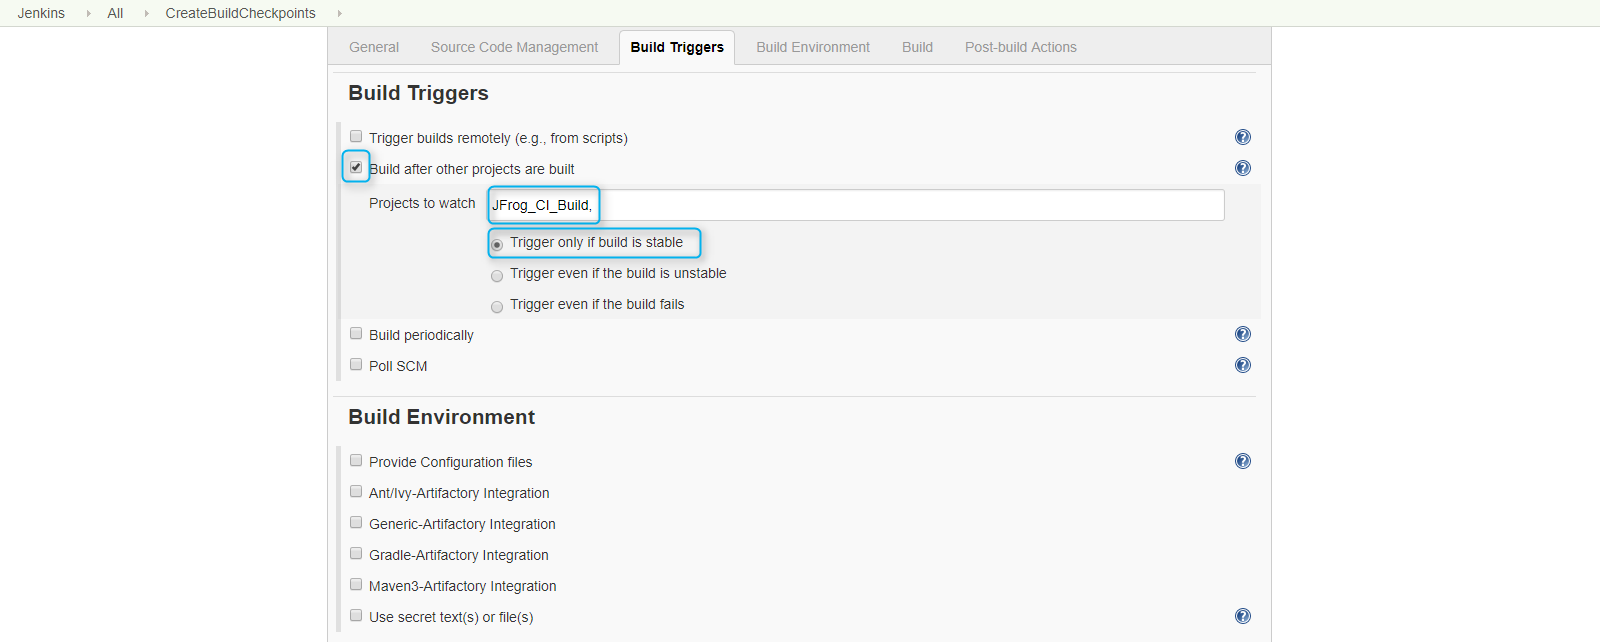
- In the Build Trigger section, Enter the name of CI Build Name. Select trigger only if build is stable.
Note
Note on Multiple CI Builds
4. Developer Workspaces
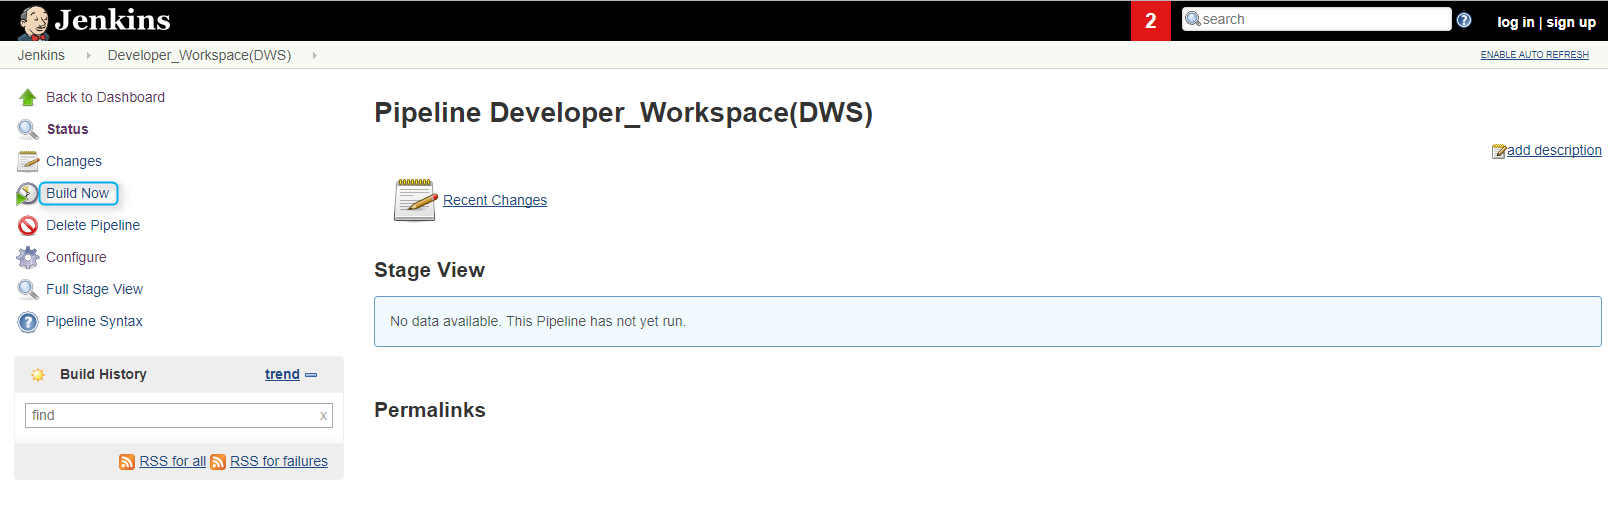
This Pipeline Job will Create User Workspaces for Private Builds on NetApp FlexClones
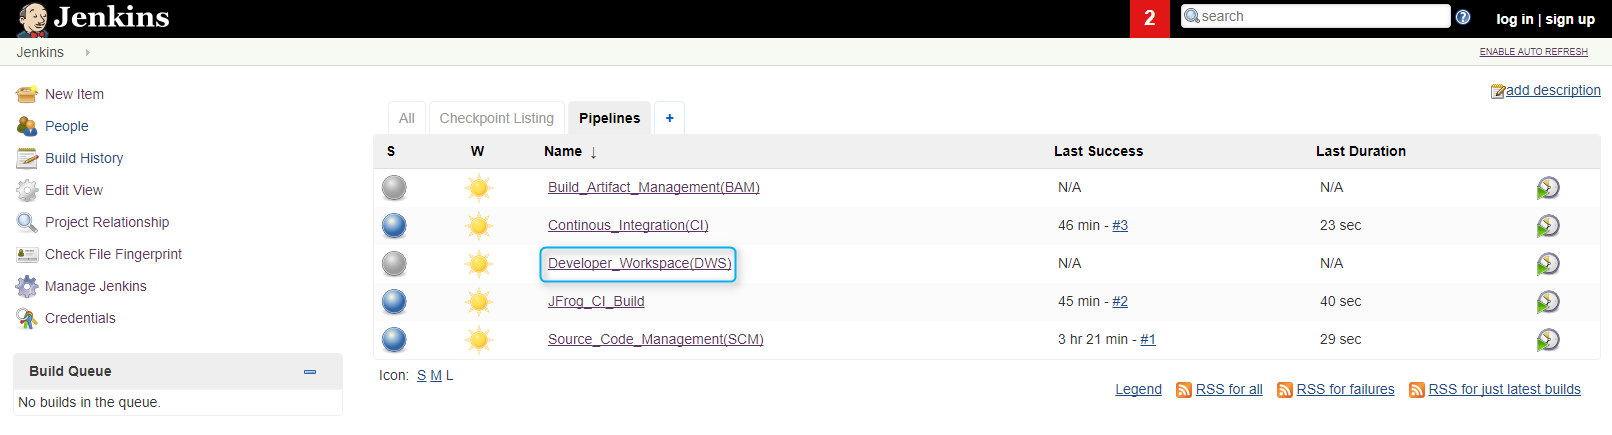
4.1) Select Developer Workspace Pipeline and Click Build Now
4.2) This pipeline requires following inputs:
Input Default What it does UID 301 UID for the Developer GID 300 GID for the Developer CI Dev Branch Name JFrog_2017_1 Name of CI Environment Workspace Name Dev1 Name of workspace to create 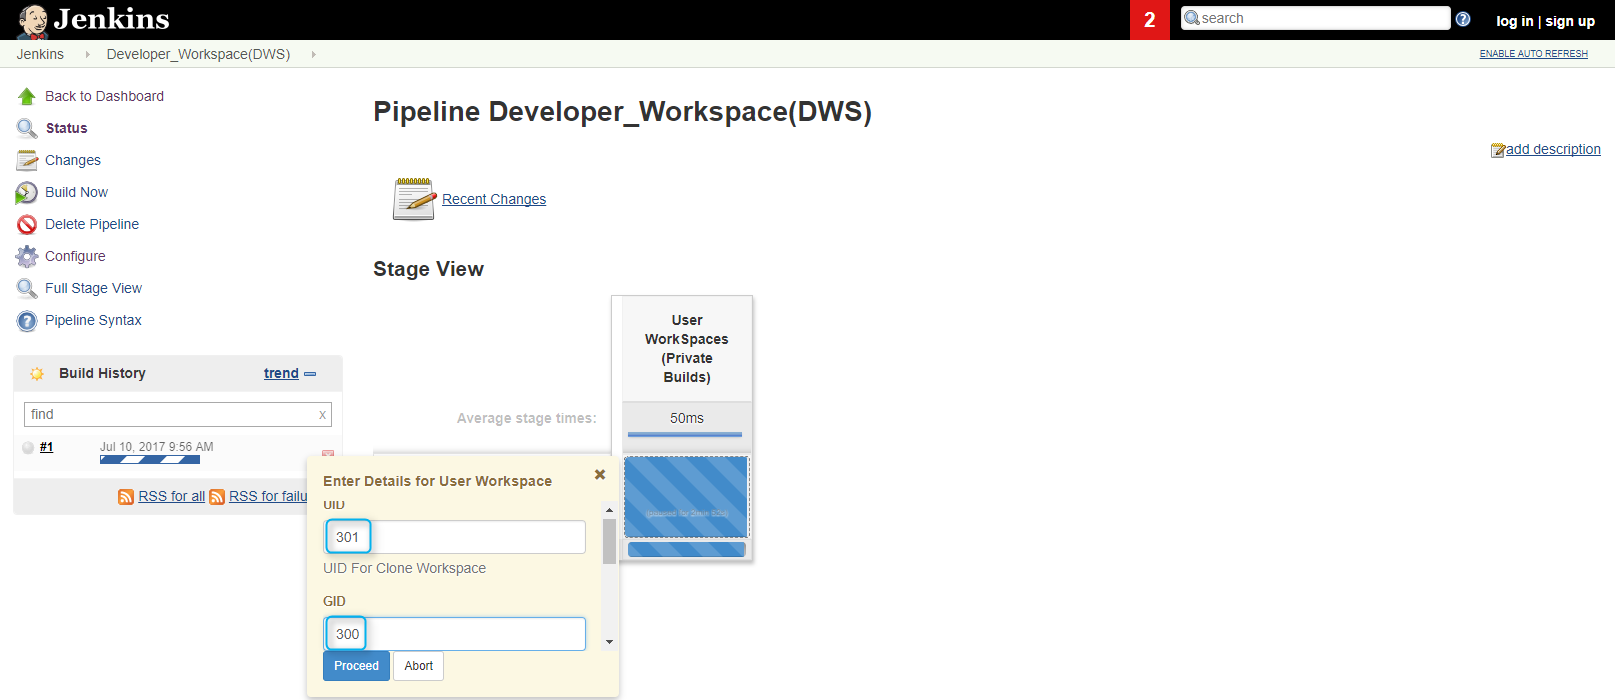
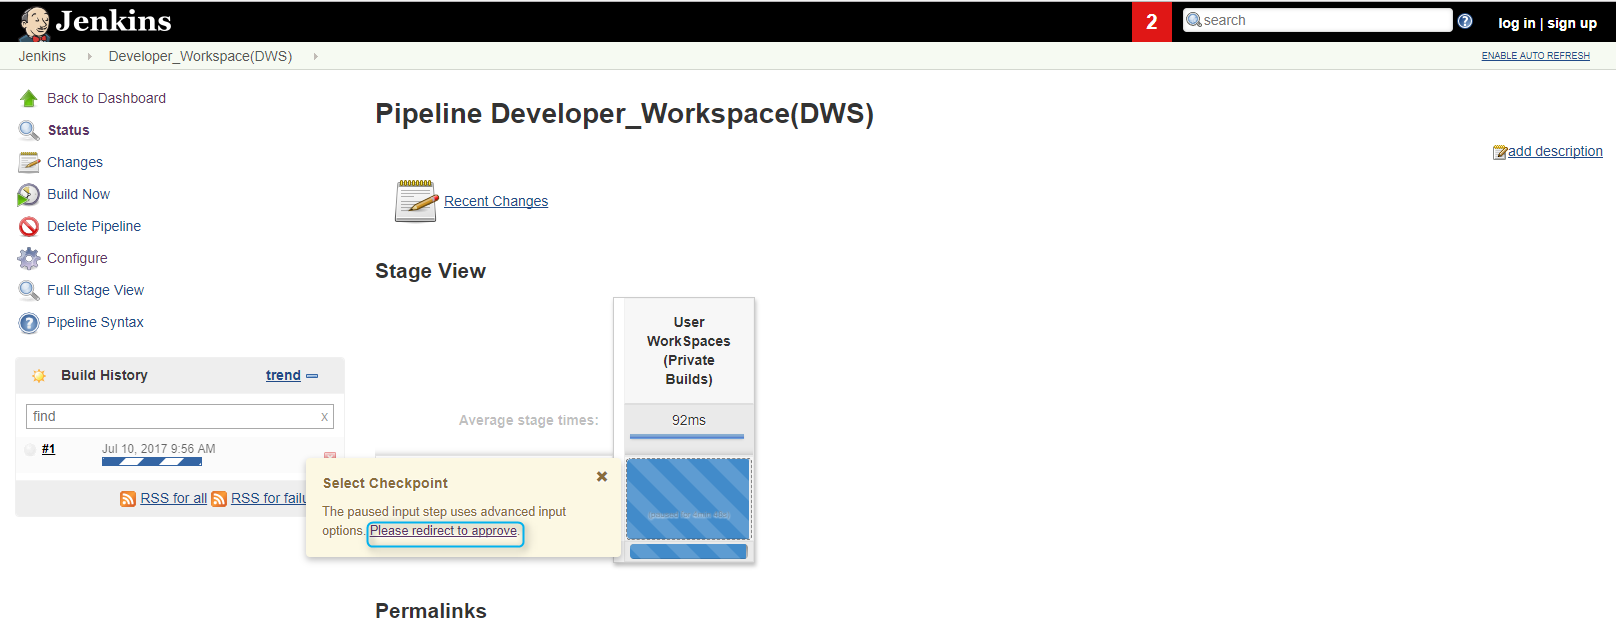
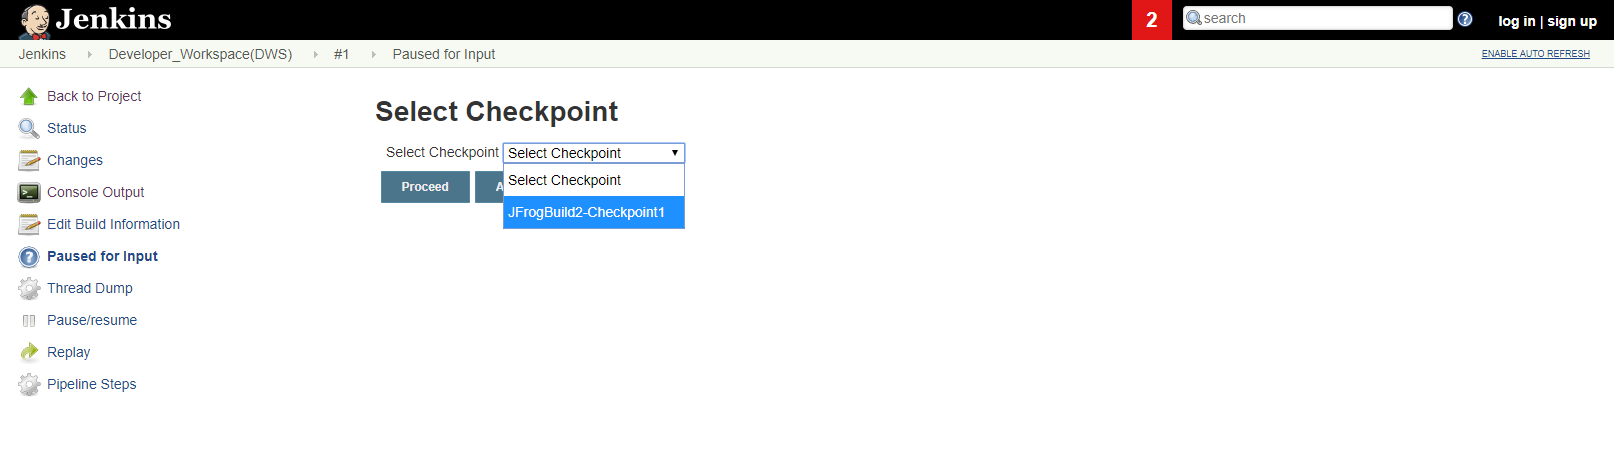
4.3) Click Proceed and Hover over the Pipeline stage to select build checkpoint to create a workspace and click Proceed.
4.4) A new docker service with a Private workspace for the Developer will be available on the Linux host. This can be checked by running following command on the host.
>>docker service ls
>>docker service ps <<Service_Name>>
4.5) The contents of this docker service can be verified by going inside the context of the container.
>> docker exec -it <<Service Container ID>> bash4.6) All the source files and artifacts will be present at
/workspace/<<Developer-Workspace-Name>>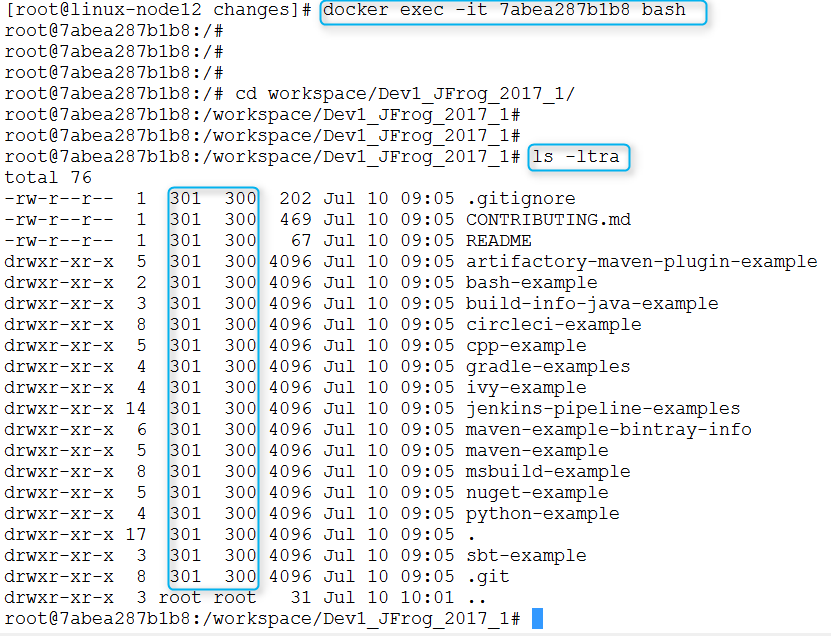
4.7) Developer can make changes to the code and then commit them.
Set the git username and email for the Developer.
>> git config –global user.name “Dev1”

>> git config –global user.email “Dev1@netapp.com”
4.8) For this validation we will make changes to the master branch
>> git checkout master4.9) As a example, a small Hello World to Hello NetApp code change is shown as example.
>> vi maven-example/multi3/src/main/java/artifactory/test/Multi3.java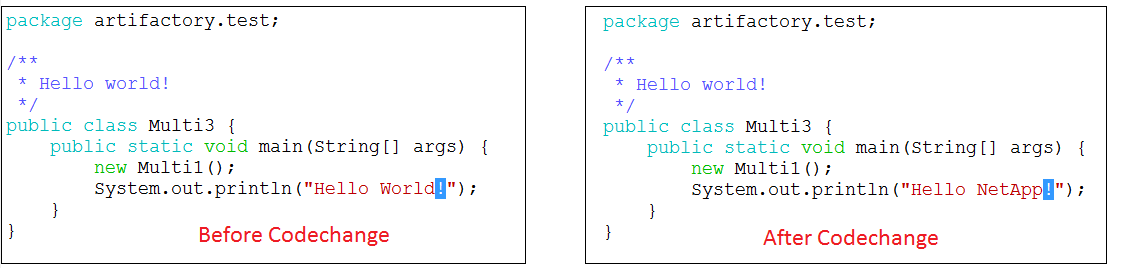
4.10) Commit the changes.:
>> git commit –all
4.11) If the changes pass the pre-push hook, then developer can go ahead and push the code to SCM.

4.12) This recent push will reflect in GitLab UI.
>> http://<<Jenkins-Host-IP/>>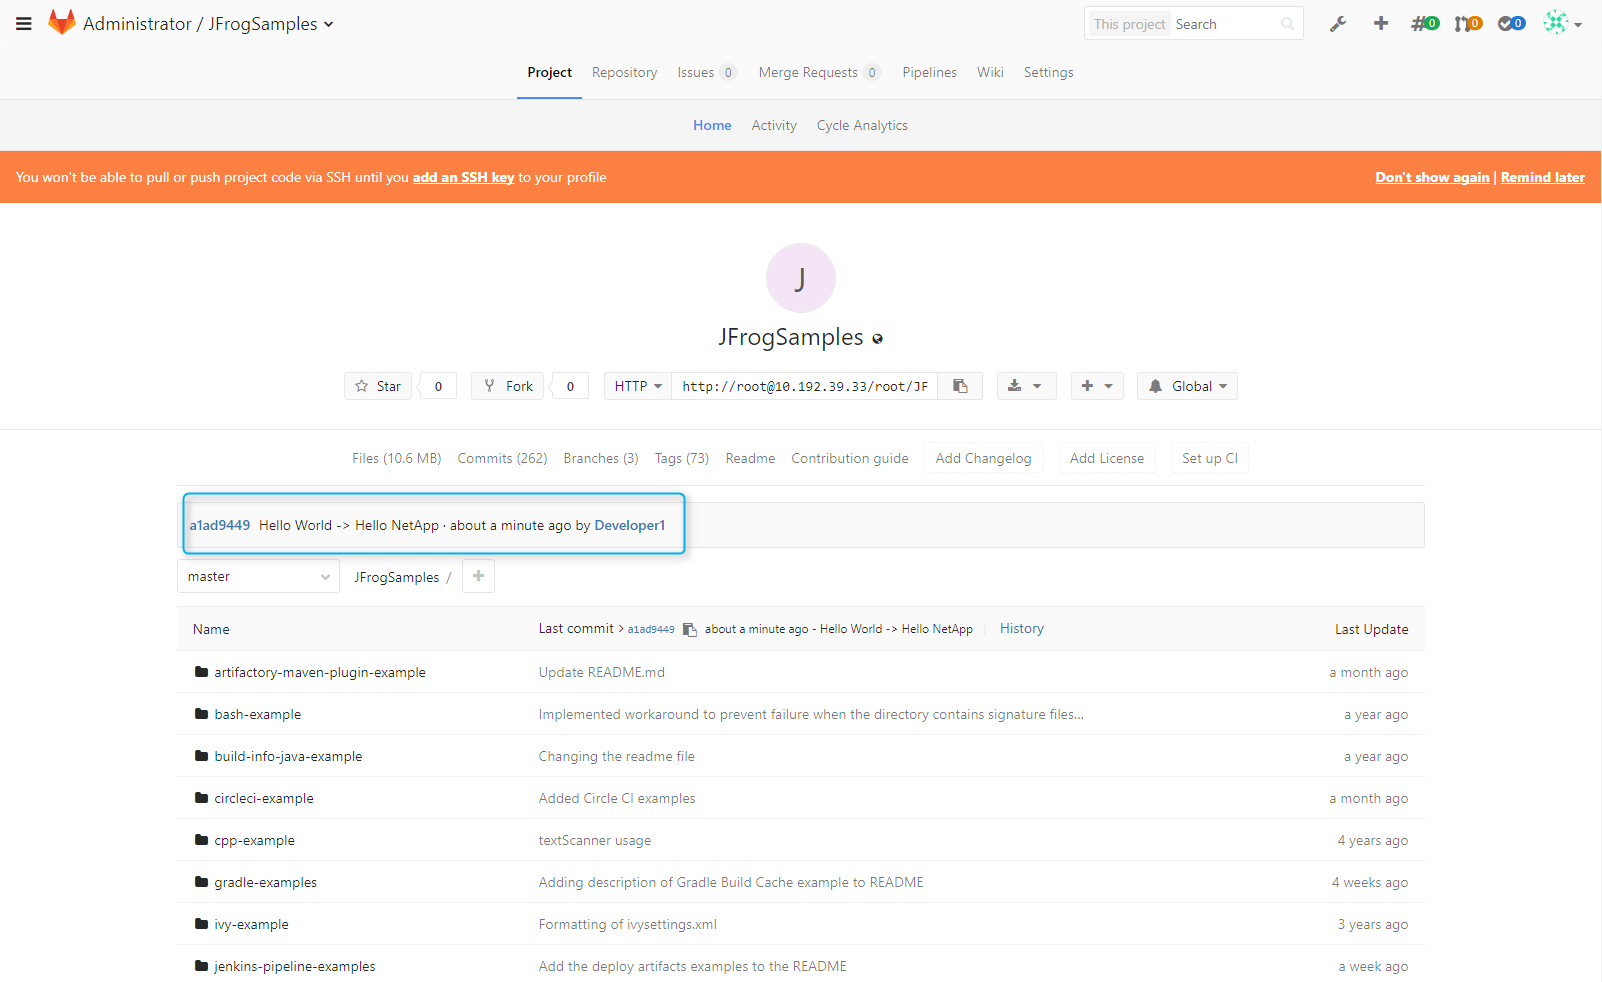
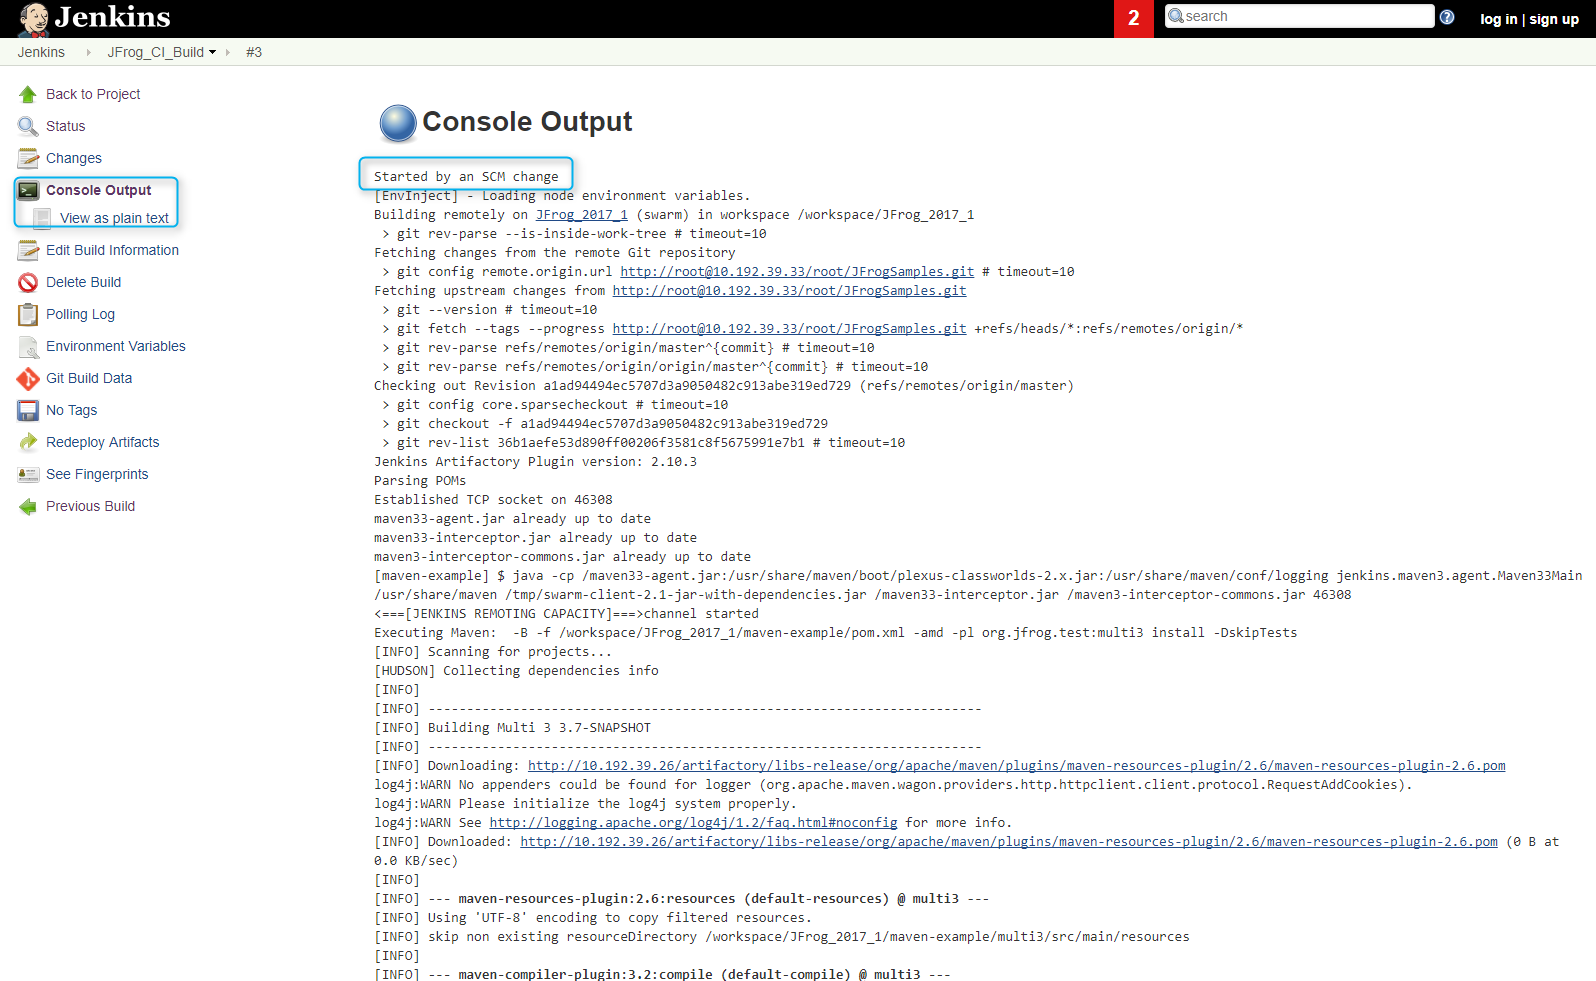
4.13) After the Git Push, the CI job will be triggered automatically as there was a change in SCM and the polling is done for every minute.
5. Build Artifact Management Pipeline
- This pipeline will:
- Create a Build Artifact Container
- Create Zip of all the volume contents
- Create Docker Image of running CI Environment
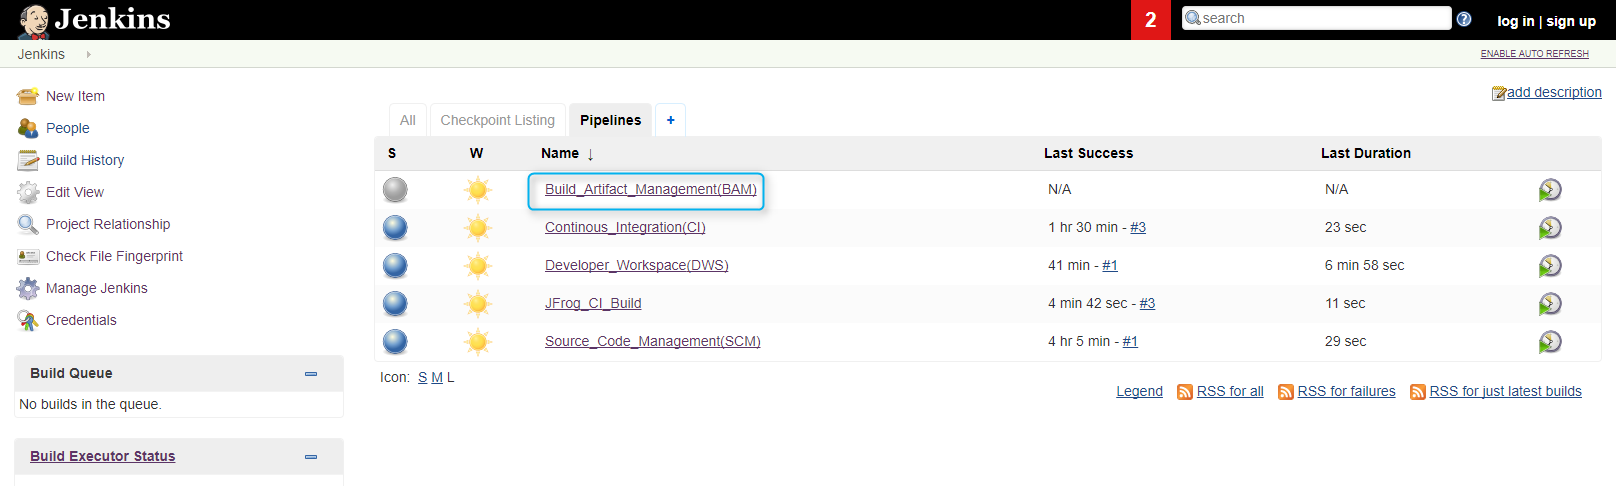
5.1) Select Build Artifact Management Pipeline and click build now
5.2) This pipeline requires following inputs:
Input Default What it does CI Dev Branch to be Artifact JFrog_2017_1 Name of CI Build Environment to Artifact Build Artifact Container Build_Artifact_JFrog_2017_1 This container will store Name of Zip File to Create JFrog_2017_1.zip A Zip file containing all contents of volumes is created. Docker Image Name to Create <<Artifactory-IP:PORT>>/image1:version1 Creates docker image of build environment with this name. Checkpoint Select from a DropDown Creates a temporary clone from this checkpoint. 5.3) Build the Pipeline
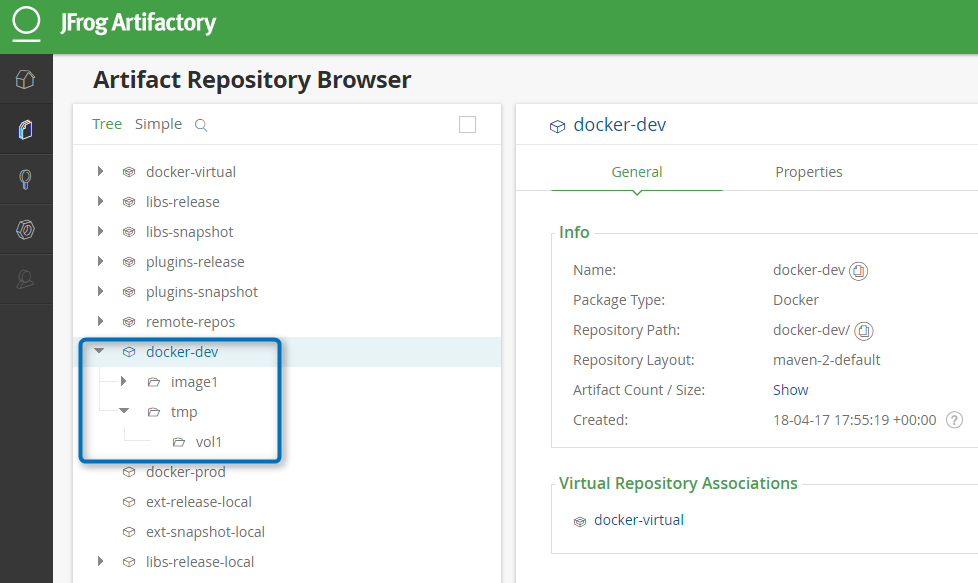
5.4) If the build is successful, a docker image will be pushed to the docker-dev repo in Artifactory.
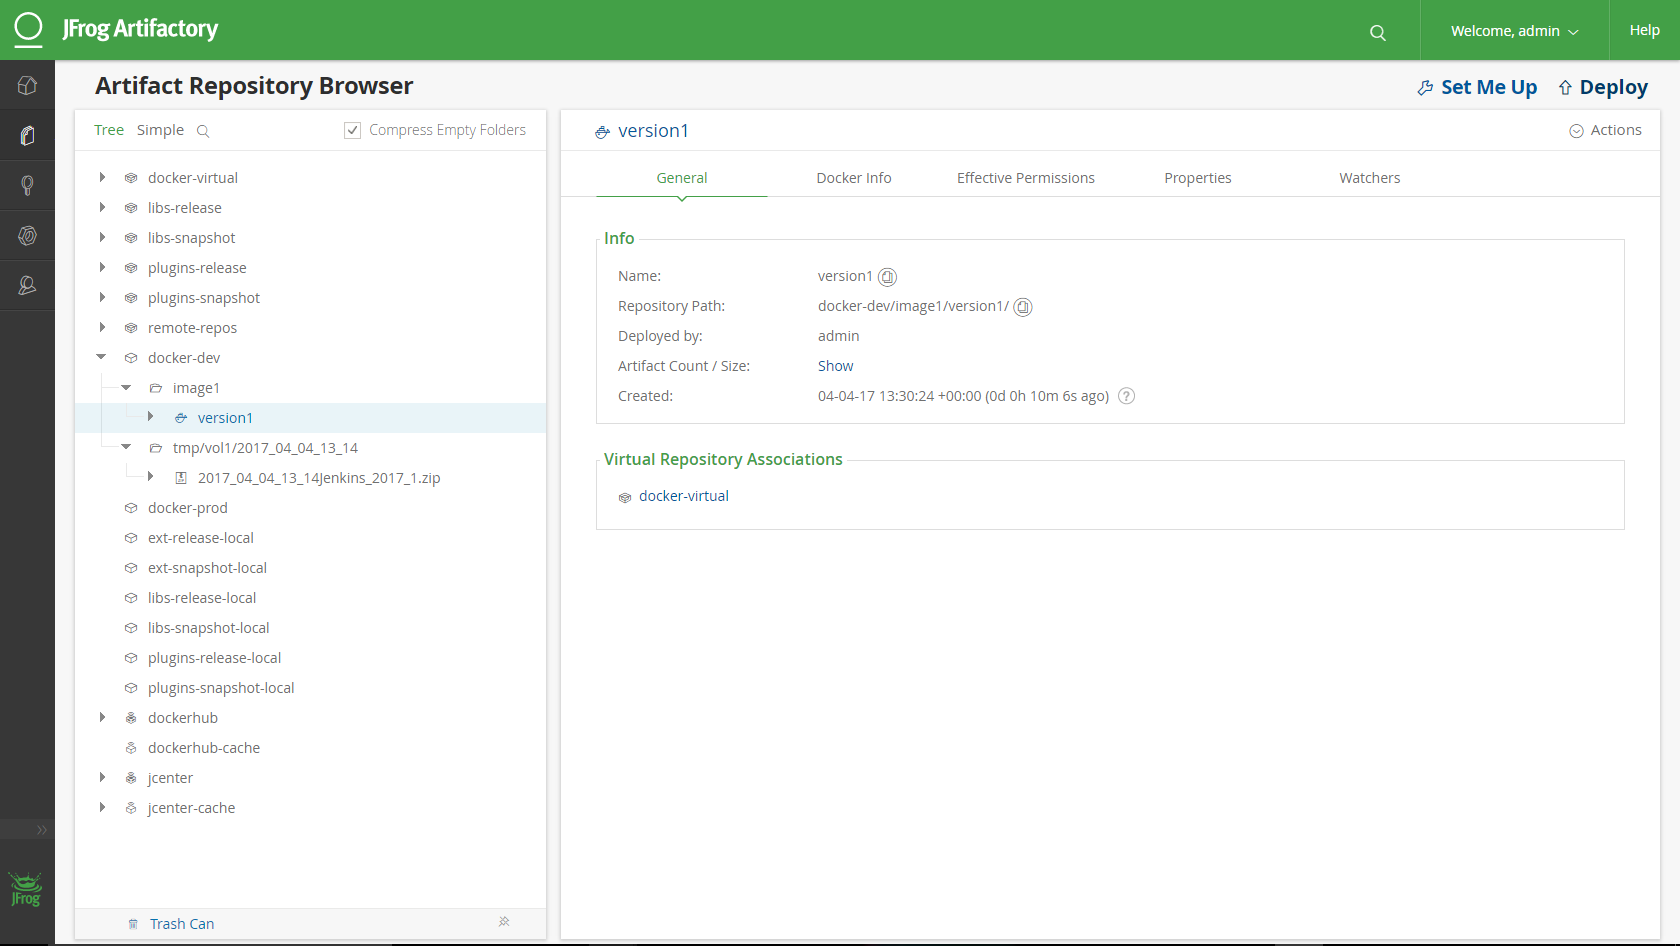
5.5) To restore your Build Environment using the docker image, login to any linux host and use the following command
docker run -t -d -e masterip=http://<<jenkins-master-ip>>:1024 -e slavename=JFrog_2017_1_copy --name JFrog_2017_1_copy <<Artifactory-Server-URL:Port>>/image1:version1
5.6) All the build data is stored as a timestamped zip file in Artifactory in the same docker repo. This zip can be downloaded/curl/wget to your backed up container.
Pre-Packaged Plugins
The NetApp Jenkins Master Docker Image is pre-packaged with following Jenkins Plugins:
- Swarm. : 2.1
- This plugin enables slaves to auto-discover nearby Jenkins master and join it automatically
- Pipeline. : 2.5
- Pipeline plugin(workflow-aggregator) is a suite of plugins used create Pipeline Jobs in Jenkins
- Git. : 2.2.0
- Git plugin is used to conduct GIT operations with Jenkins
- Extended Choice Parameter Plugin. :0.76
- This plugin provides an option of having DropDown input sections in pipelines
- Artifactory. :2.12.1
- Artifactory plugin resolves the build artifacts from local instance of JFrog Artifactory
- MultiJob Plugin. :1.24
- MultiJob plugin lets you have multiple types of job configurations in a single job
- To Bundle more plugins in the Jenkins-Master Docker image :-
Open the Dockerfile in any text editor
Find the line with plugin install script
RUN /usr/local/bin/install-plugins.sh workflow-aggregator:2.5
Append your plugin-id:plugin-version to the the above line, e.g if you wish to package the blueocean plugin in Jenkins Master
RUN /usr/local/bin/install-plugins.sh workflow-aggregator:2.5 blueocean:1.0
Save the Dockerfile
Build a new Docker image.